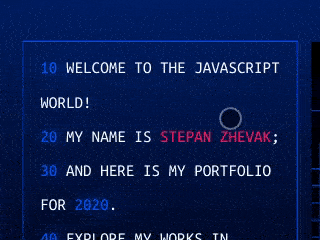
Hooray! I've finished writing the code of my portfolio. Now anyone can visit the website zhevak.name and look at fascinating effects, learn my previous experience and even make a job offer, that I wouldn't be able to decline.
In the article below I will tell you how I made it, what tools I used, what went wrong, and what eventually I got. Probably, something of that would be interesting for product managers or businessmen, but primarily the article is written for experienced programmers front-end developers.
There are so many topics I would cover here, so I'll try to focus attention on the most interesting or unobvious things, instead of the detailed step-by-step explanation. In this connection I recommend you to open a section of the portfolio, that you're reading about. Moreover, you don't need to learn the whole article and can just look into those sections, you're interested in.
Planning
The manager used to start his work from daily scrum meeting, but I prefer to set a goal and decompose it to atomic tasks. My goal is very clear, I'm going to create my portfolio to get a job in the dream company, that is ready to pay good money for intellectual thinking. It should be the website, where all my former experience is described in an interactive way. It must look modern and impressive, be maintainable and use cutting-edge technologies.
To say frankly, I got the idea for the "operating system" in the browser for years, so the only question was the implementation. The first step in the planning of any serious website is the partition the content into the pages. The only entity above the page is the wrapper, which is a controller of those pages. When I talk about the page I imply the component, that fills all the space on the screen. In our case 4 such components are expected to be used:
BiosScreenis a screen, imitating BIOS.GrubScreenis a screen, imitating the loader GNU GRUB.EffectScreenis an incredibly spectacular splash screen, drawing a keen interest of the user.DesktopScreenis a screen, containing an authentication form and a desktop with all the necessary information.
What's next? We need to decide on a technology stack. Nowadays there are some widely used client-side frameworks:
- Angular by Google. I wrote nothing serious using this framework, and with good reason. The first version was structurally ugly, there were a bunch of entities with strange responsibilities. In those times BEM by Yandex seemed far more logical, and this is why I used it. Then they wrote the second version, where some things didn't work and documentation was so slack-baked, that often people were forced to read source code. Then fourth, eighth... But still, I haven't understood why I should use this library, if there are so many other solutions for a long time, that are more flexible and comfortable for developers, and also have a great open source community. I won't use Angular until I don't work at Google.
- Vue.js by Evan You looks not bad and has a rich infrastructure (that couldn't be replaced without enormous efforts, however). Also, Vue implements conception of OOP muddy enough, so there are some troubles if you use SSR and multiple instances of the library. I'm not going to render something on the server, but also I try to avoid using Vue unnecessarily.
- React by Facebook, in my own opinion, is the best solution on the market, providing maximal flexibility on the development of interactive applications. In addition, it has the biggest support of the community — you can use a lot of libraries
of dubious qualitywritten or adapted for React. And of course, no one template engine can compete with jsx-markup. - Svetle? Polymer? MyGrandmaFramework? No, thanks, I need the solution to solve business issues as well and fast, as it's possible. I haven't enough time to write all the infrastructure from scratch.
The framework is chosen, but what language to use? I don't consider WebAssembly still, and aside from him there are 3 candidates:
- JavaScript without typing can be a nice option for small or middle projects, but long-lived monsters should be written in something stricter.
- Flow by Facebook still godlessly slows down on Linux, creating a lot of forked processes. I don't know what's wrong, but it works on my laptop very slow.
- TypeScript by Microsoft is an undisputed leader of typing in JS (at least to date). Although I can't call TS stable, this is already a working tool (especially with Visual Studio Code). Furthermore, the language evolves and new versions get better and better.
I will write CSS in Stylus. There is no room for discussion here, because this preprocessor has the most laconic syntax, works stably in projects of any scale, allows to create complicated transparent mixins and requires minimal configuration. Some developers could ask me, why I don't use so popular PostCSS? Well, because it contains a floating bug somewhere in dependency resolving algorithm, that came out on large projects only. Because I don't want to spend a few hours configuring conflicting plugins. Because its flexibility isn't required on typical websites.
And finally, we need to choose the state management solution. I could make use of so popular redux, but why should I torment myself? Let's try to launch MobX on a big project.
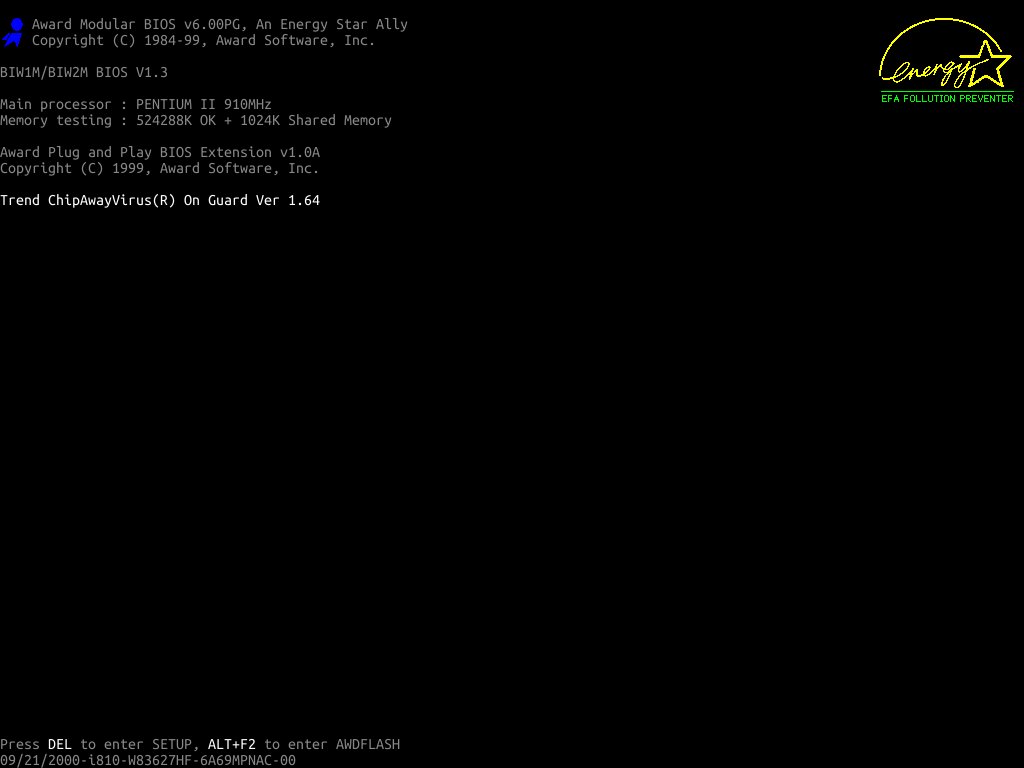
BiosScreen
Seemingly so easy page as BiosScreen shouldn't take much time. But there are some interesting details to discuss, even here.
SVG Logotypes
All we remember logotypes of Award Modular BIOS and Energy Star, blinking on loading old computers. Where can we grab it in SVG? Well, one of them can be downloaded from Wikipedia and retouched a bit... But do we need those smooth lines? No, no, no! We need pixels in good quality and without anti-aliasing!
There is no easy way, so we have to convert raster images to pixelated SVG. As such script hardly will be needed somewhere again, we can run it right in a browser console :-)
 1 const logoNode = document.createElement('img');
 2 const canvasNode = document.createElement('canvas');
 3
 4 logoNode.onload = () => {
 5   const {naturalHeight, naturalWidth} = logoNode;
 6   canvasNode.height = naturalHeight;
 7   canvasNode.width = naturalWidth;
 8   document.body.appendChild(canvasNode);
 9
10   const canvasContext = canvasNode.getContext('2d');
11   canvasContext.drawImage(logoNode, 0, 0);
12   const imageData = canvasContext.getImageData(
13     0, 0,
14     naturalWidth, naturalHeight,
15   );
16
17   let svgOutput = `<svg
18     xmlns="http://www.w3.org/2000/svg"
19     viewBox="0 0 ${naturalWidth} ${naturalHeight}"
20   >`;
21   for (let w = 0; w < naturalWidth; w++) {
22     for (let h = 0; h < naturalHeight; h++) {
23       const index = (w + h * imageData.width) * 4;
24       const [r, g, b, a] = imageData.data.slice(index, index + 4);
25       if (r + g + b < 128) {
26         // Filter black pixels
27         continue;
28       } else {
29         const color = r > 128 ? '#ff0' : '#0f0';
30         svgOutput += `<rect
31           x="${w}"
32           y="${h}"
33           width="1"
34           height="1"
35           fill="${color}"
36         />`;
37       }
38     }
39   }
40   svgOutput += `</svg>`;
41
42   // Copy output to logo.svg manually
43   console.log(svgOutput);
44 };
45
46 // Logo https://www.hardwaresecrets.com/wp-content/uploads/original1.gif
47 logoNode.src = `data:image/gif;base64,R0lGODlhiQBVAJEAAP//////AAD/
48 AAAAACwAAAAAiQBVAAAC/5yPqcvtD6OctNqLgt68bwyG4nh45omS6kqigeWy8tyYs0
49 3nqqcnfA+cdIKMIfGY4SAfxqWu6XRAoy0lVTK9Xqxa4acL+4Ir3DFTYwaJ04oym7x+
50 x99btHxOr9vH+Lx6r9Xn9/cSCDi4c4gkiBjCmPPYSLgUKTlJVGl52ZOpGRHXqeeZCK
51 pIOkqqGOqFmjhgaioS2xr2Clt4SiuLe4s7MquLtYcHTFEcDAHYd5zMjFzja1sUXfe8
52 abBMbaxtLdw267wQ3u2jDc7dTC76jf6nXjstM/5ui756pu6iD61/Ap3fz5+UgDi+vS
53 P4gx/CWPforXCTxGGVduzazZNYbhzEiP+6KJZrNm8jRwwiIZX8OO1iPY8q62Hz6Mql
54 j4ziWq78BNNgiZzppI08tGZOw53MVAJ9+NLXMKWlmPJMmfMi0Kc7P3JZSjToUqo1w4
55 WkxhWKFTu8yr5Q9mFoxqcawTLF9yoJWrJnxWA1MvRkTVYoq/rkuNWtElB+tXJNCofv
56 yJeIZ/5Fo4qmY7rRbP71hkUn0ZsR75ozK7hQU0dtMfvdHHcq1styRYoWajmUM6dr6U
57 p+nM6iaHak2cJc3Rr4WODxzjHu606xlMaAnaYwVuIfNt4KBx62fot5UqXwGJalXtG1
58 1K7ZTt+IXmSx9qwJ5YaJ0VX9w9fx0LuvHRy8lyaf25j/tI+cKqpx44Zae6F2hG3iOH
59 ZbFvmt94uDQPBS33F96ZWVefNRoaB/GaS0Ek9DGEgHZAS+FV5LBXVTUmVQxSZhR8Cg
60 iN9ElrXS4W3zXRcMhhj9CGSQQtIhQJFGHolkkkouyWSTTj4JZZRSQjlklVZeqQ6SAx
61 yJgAALcGmAkWEm4GWXB3ippZhbFjlmm2eqCWaaZ64pZplb0slmmmqSyaebdpo5pp1o
62 9jmnn4AKuqabhiL6552Bklkmooo6SmmhlkbKJqGDPgropZY6ymikmlK6qaeNZipppa
63 QqEOeepb6J6pynjqqoqI++imeYcLoKKpx3ptpqpoROqmWniw67aq3HOiZq7K+fcjor
64 s8nKykC0njbLKLLAHkqttMS22aihh27LLatcWmstrLrWGWynu9qqKrp4AnvutfMmWw
65 AAOw==`.replace(/\n/g, '');
66
67 document.body.appendChild(logoNode);
So what do we have? 95 KB, a bit much. Let's execute svgo logo.svg and optimize it by 68%! After that the image size is only 30 KB, but can we make something else? Let's open any SVG editor and join all the pixelated rectangles of the same color to a single path. Save, run svgo again... 3.8 KB, I'm satisfied. Now it's time to repeat all the manipulations with the second logo.
beep
How to emulate soundblaster beep during the "loading" of the operating system? That's easy!
1 const sound = 'data:audio/mp3;base64,...';
2 const beep = () => {
3   const audio = new Audio(sound);
4   audio.play();
5 };
6 beep();
Run! It works... Or doesn't it? Works sometimes. This is because in some cases the browser raises an error DOMException: play() failed because the user didn't interact with the document first, which means the sound can't be reproduced until the user perform any action. Of course, we can wrap up the call play() in Promise, but the speaker won't squeak more often. Therefore we open StackOverflow and read recommendations.
Among other things, they suggest calling beep() within a handler of the mouse event. Okay, let's do that, but there is one tiny detail. We need to play sound in a certain moment, that is independent of a mouse cursor. This issue could be solved by setTimeout! And for the case, when mouseenter hasn't been emitted, we will try to squeak within Promise.
From the browser view, it would be logical to play sound always, if some interaction happened, but for some reason, we listen to beep from the events handler only. Looks the browser analyzes call stack of the method play.
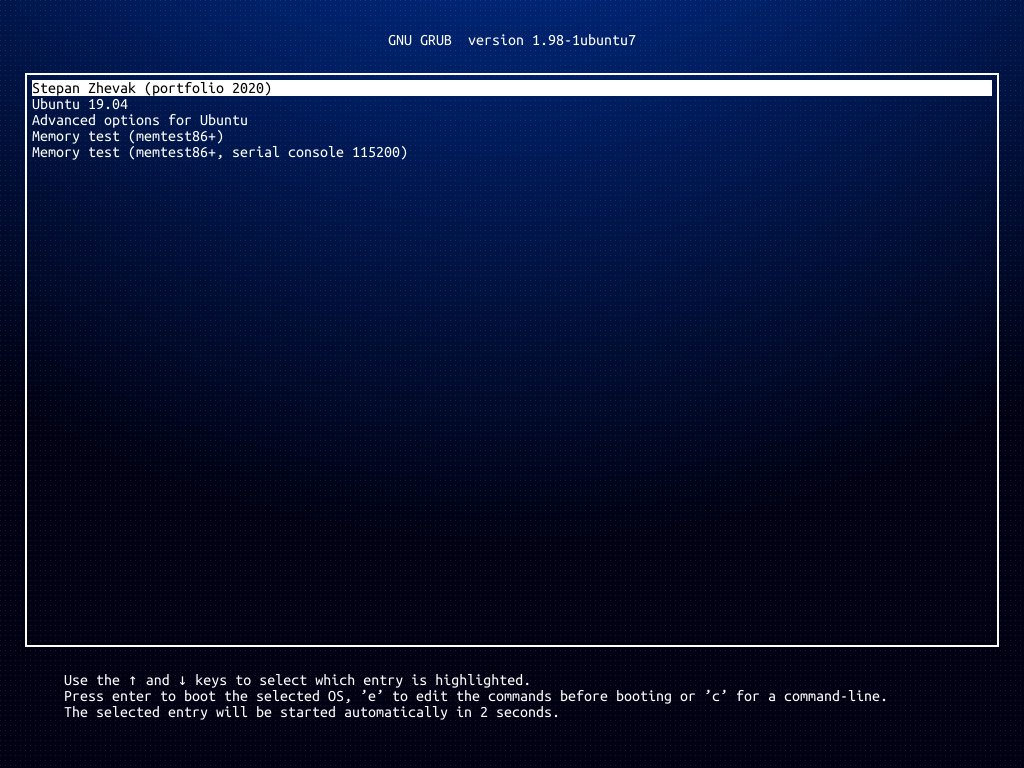
GrubScreen
We've gone through the easiest page with BIOS only, but so many problems appear already. Well, that's how IT works: innovations cost the time. Now we have to "program" GNU GRUB. I could dive into the details, create own console, run a real emulator on JavaScript... But why? It doesn't matter for the portfolio and trust me, there will be plenty of "interesting" tasks pretty soon ;-) So I decided to take the easy way: if the user selects any menu item except the portfolio itself, an error is shown. Why not, perhaps grub.cfg was modified, sometimes it happens.
As building the layout for this page was harder, than writing business logic, in this section, I will tell about connecting components to MobX. At first glance, that's so simple: there are dedicated decorators observer and inject. Write inject('$store') (observer(Component)) and use the data! That's it, but there are a few issues.
mobx-react
Firstly, observer watches for own component only and ignore nested children. It seems, such behavior is described here. In other words, if you apply some decorators before, the last one is observed only. But obviously, its render method doesn't call any getters like observable or computed, that should trigger rerender. So in short, observer must be first in the whole chain of decorators. But this is even mentioned in the documentation, so it's no big deal.
The second thing concerns the decorator inject, and it's much more insidious. Furthermore, nothing said about it in the documentation. The fact is that inject creates a new object of stores on any update of observable or computed property. That object consists of all the same properties as previous (the set of stores stays constant), but nonetheless, it's a new instance. So if you pass a decorated observer to inject, you risk getting half of a jsx-tree redrawing on any property change. A more detailed explanation can be read on this topic. And since most of the time inject is applied directly to observer, nobody is going to fix such behavior. For the rest cases, it's enough to wrap the component in React.memo.
HOC to HOC
To avoid writing every time inject and observer one after another, to get strictly typed stores in props and to unsubscribe from all the reactions by calling one method, I wrote own decorators, those are kind of syntax sugar. If you use MobX and TypeScript together, I advise you to do the same.
EffectScreen
BIOS is emulated, GNU GRUB is emulated, now we need to emulate the loader of our "operating system". On the previous screens, the challenge was to copy the "design" of existing software as precisely as possible. Here we can and should to use any graphical tools to create wow effect.
Of course, we need 3D graphics! Let the user see a fascinating animation, then whooooosh, the camera flies out of a monitor and appear in the room with a blinking light and many computers... Or monitors. Then in the end the camera flies into the other monitor! And we need something hacking, for example, a dragon from Kali Linux. And let him breathe fire! Does it sound cool? Maybe, but not necessarily, it all depends on implementation. So how to stage up such a scene in the browser, that has a limited performance? Well, if you don't try things, you will never know how to optimize them ;-) But who will be impressed by that?
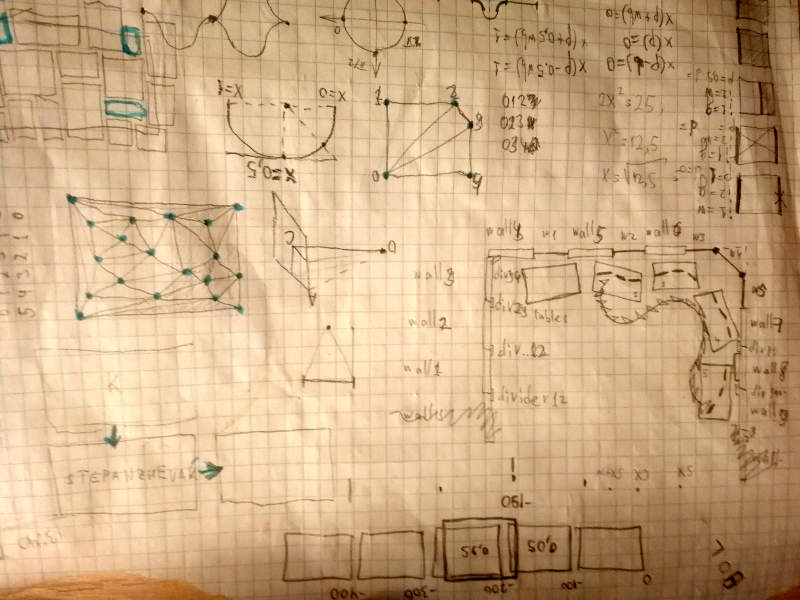
Sketch
It's not so easy to keep in the head walls, windows and 12 monitors on 4 desks. Therefore before the modeling 3D scene, I drew a pencil sketch: where to put things in the space, how to move the camera and so on. It doesn't take much time, but it will save hours in the future when sizes and coordinates are required.
Three.js
As I'm not a modeler at all, unlikely I will create a scene more complicated, that a set of parallelepipeds, even in a dedicated 3D editor. That's why I decided to build objects by the code. Furthermore, Three.js has a lot of utility classes for this very purpose. Such an approach is even better, I think comforting myself, because there is no need to load models asynchronously, there are fewer polygons. And what about textures? We have to wait for them anyway.
Fortunately, Three.js already has taken care about the loading of resources asynchronously. To handle the downloading of multiple files, we can use LoadingManager. If you're too lazy even to create a new instance of the manager and to put it to every loader, DefaultLoadingManager at your service.
Another "feature" of Three.js is an intensive memory usage :-D But you can avoid the problems by invoking the method dispose from componentWillUnmount.
SkyCube
To make the scene more realistic, I used the skybox. This is a very large cube, textured inside. When the camera rotates within the cube, the effect of presence shows up as on Google Street View.
Texture + Material + Geometry = Mesh
We shouldn't create a new texture, material and geometry for every object on the scene, it's better to reuse existing ones. Luckily, objects of my scene are identical, so they can be instantiated by the factory or the class inheriting from Object3D.
By the way, after the screen had been finished, I came across an interesting library react-three-fiber. Based on providing API, I could write the code of my scene in a declarative style, sort of:
 1 <Canvas>
 2   <DirectionalLight />
 3   <SpotLight />
 4   <SkyCube />
 5   <House>
 6     <Table>
 7       <Monitor letter='Z' />
 8       <Monitor letter='H' />
 9       <Monitor letter='E' />
10     </Table>
11     <Table>
12       <Monitor letter='V' />
13       <Monitor letter='A' />
14       <Monitor letter='K' />
15     </Table>
16   </House>
17 </Canvas>
Lighting
Originally I had 3 sources of light in the scene. We can't get rid of DirectionalLight, but others, red and blue, slow down the rendering. Eventually, I left the only blinking SpotLight, which changes its color in the midpoint of the camera track. This trick increased the performance and didn't impact the visual component.
Camera
At first, the camera moves back from the first monitor, then runs out of semi-circle, then gets closer to the last monitor. That is to say, backward, forward, backward, forward... What does it look like? Of course, like a sinusoid, that I use to compute coordinates of the camera, picked up a phase, amplitude, and frequency of the wave empirically.
Monitors
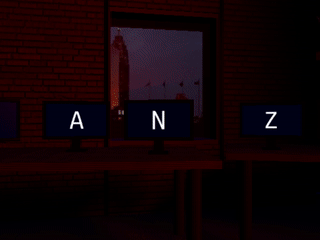
The monitor consists of 7 parallelepipeds, and there is no point in discussing them. The more interesting thing is a display, which is PlaneGeometry with texture CanvasTexture. The monitor factory takes a canvas node and returns a Group of 3D cubes and a screen plane.
I decided to draw modestly one character from the string STEPANZHEVAK on each screen. It's my initials, 12 letters in total, as the number of monitors (there are coincidences indeed). To speed up the rendering I set the resolution to very low (only 160x90 pixels) for all canvases, except the first and the last, because the first monitor is going to render intro animation and the last outro. By the same token, no one frame contains both monitors simultaneously, so I can use a shared canvas. It doesn't improve the performance but saves a bit of memory.
By the way, Three.js knows nothing about the contexts of all those canvases, and can't update all textures CanvasTexture on every frame, it's just a performance issue. That's why we need to update a texture manually whenever its context was changed. This is done simply:
1 // Typings in @types/three are a bit broken
2 (mesh as any).material.map.needsUpdate = true;
Anything is clear, except for a little detail. The monitors, all as one, have an aspect ratio 16x9, but the user's screen (or more precisely the window of a browser) could be of any size. In other words, if the camera points to the first monitor, intro animation either will be cropped or include a monitor frame. Of course, monitor fits exactly in the browser window for some lucky users, but how to make happy all of them? It seems, we need to draw an animation on the 2D canvas, and then make a transition to the 3D scene. Oh... I had to do so, but eventually, I've never regretted it.
Thus an intro animation is finished by the first letter S, then the transition happens, the camera flies across the room, reaches the last monitor, where an outro animation is starting from the letter K, then the transition happens, the outro is finished and the next screen appears. Awesome! What else do we need? Probably, more interactivity.
Let's attach to the document a handler of mousemove events, that draws the cursor on each monitor, except the first and the last. To be sure it will work fast, let's wrap up the handler in throttle with delay 16 * 4 ms (roughly equal to 4 frames). Now the user can move a cursor on the real screen, and a similar cursor will be moved on each monitor. Definitely, it has become more fun.
Intro
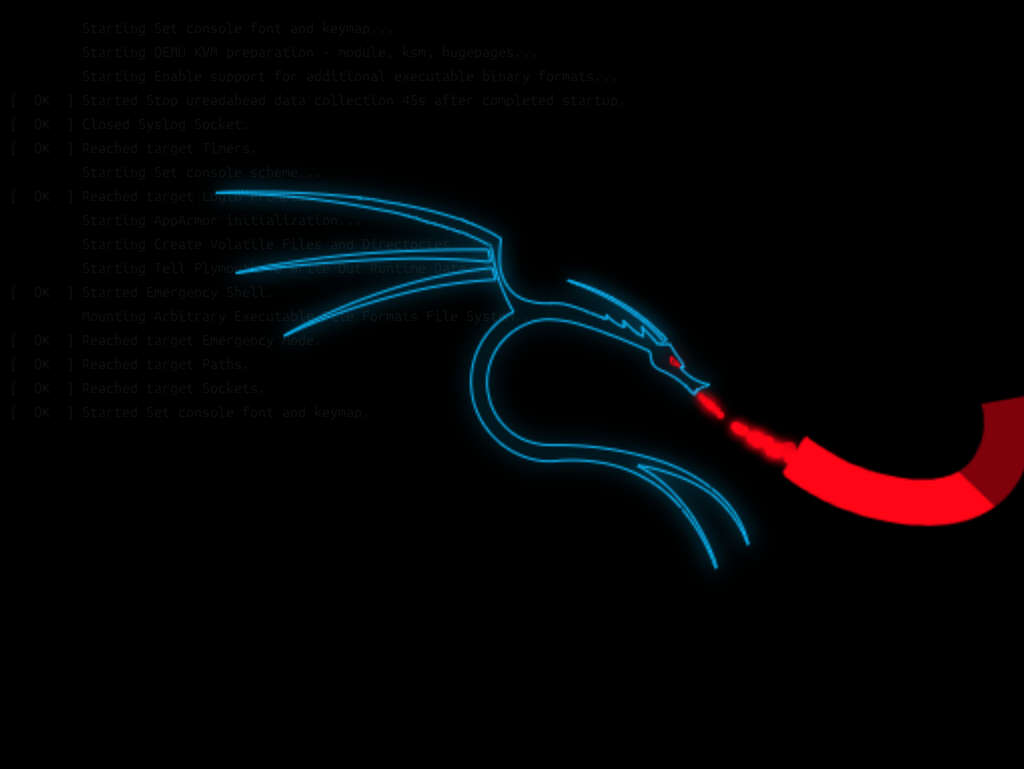
It would seem, EffectScreen is already done: the camera flies across the room with the monitors, where my initials are written. But such a scene doesn't look like the loading process of the operating system. Therefore it's necessary to create more sensible animation on the first and the last screens. It will be suitable to use a dragon breathing out the fire forming the letter S.
Technically the dragon is 4 paths of SVG image. To animate their appearance we will draw a dashed line with the dash length equal to the length of a path, and with the same gap between neighboring dashes. Also, we will set an offset of dashes from 0 up to length. This technique of the drawing SVG is widespread enough, but not less fascinating due to its popularity, especially if you adjust some settings of the stroke (i.e. some options of the canvas context, you draw on).
1 const path = new Path2D('YOUR SVG PATH HERE');
2 const length = 5000; // empirically measured length of path
3 const progress = 0.5; // from 0 to 1
4 context.setLineDash([length, length]);
5 context.lineDashOffset = length * progress;
6 context.stroke(path);
How the fire could be drawn? Until nothing super realistic is required, that's easy enough. In our case, the fire will be presented by 50 particles (circles) of the orange color. Their size, position, and opacity will be changed during the time. After the particle flew out from the dragon enough far and completely cooled down (became transparent), it returns to the dragon's mouth and flies out of there again.
There shouldn't be anything difficult with the fire, but actually writing such particle system in a functional style (i.e. as a pure function, that doesn't depend on its previous state) isn't so trivial.
Finally, we need to render the letter S, that the fire fills smoothly. Here we can steal borrow many interesting solutions from the motion design, but as usual, I took the easiest one. I decided to draw a thick sinusoidal mask over the letter S and frame by frame clean it up. To show the particles are getting cold, I animated the color of the letter from fiery to white. To make the edge of the black mask smoother I added yet another outrunning semi-transparent mask. It's also possible to use the gradient for such purpose, but computing derivative of sine to point it towards mask direction is much more difficult, and also rendering will be slower.
Well, now intro is done for sure! Let's open it on the phone. Hm, there is only a quarter of the dragon. This is because virtual monitors have a constant aspect ratio, that doesn't depend on the user's screen. So how to fix it? There is no way, except the computing some scale factor from the screen width, and then multiply all the sizes and some coordinates by it.
Outro
Now we just have to get a white background from the white letter K on the last monitor. It will be a final frame of EffectScreen. Let's zoom in the screen so close, to displace the whole black background out of frame. Also to make an effect look better, let's rotate the camera and add colorful squares, emulating screen pixels under the microscope lens.
Now work is done and looks great, it's time to get the smartphone out of pocket. Uh, the animation is broken again. Now the camera doesn't hit the letter K, that means, we just zoom in black background. It's possible to move the camera a bit (depending on screen size), but such a shift is noticeable to the eye. Therefore I just animate background from the black color to the white. Now it doesn't matter, where the camera has flown in because the last frame of the outro will be white in any case.
Functional Programming?
To avoid confusing you, I should say straight: creating such animation from intro to outro is a very difficult, long and painful process. Here, in the article, the material is well structured, but there, in the git history, there are dozens of failed attempts and the same number of fixes. Any challenging project is a result of many iterations. The duration of the "loading" is about 18 seconds, and if I watched it every time from the beginning to the end, I would still play with the dragon instead of writing these words.
To boost the development, I wrote render function as pure. It means all the coordinates, sizes, colors and rest variables depend on the elapsed time only, passing via arguments. It allows us to start and to end rendering in an arbitrary moment, to draw a certain frame, to loop some time interval and so on. The only disadvantage of such an approach is that writing the pure code is harder than the crappy code.
TypeScript
Typed code is more stable, but it would be a mistake to assume that TypeScript will solve all the problems of a project, maintained by cheap contractors from Moscow New-Delhi. If you write poor types, refactoring takes even more time in comparison with vanilla JavaScript. Bloggers-marketers don't like promoting edge cases of TS at conferences, but sometimes it doesn't work properly. And it's not about usage prohibited keyword any, the problem is a limited stack depth of the language. Below I'll tell a bit about my experience with TS.
global
Let's start with the easiest case. If something is missing in the global scope, we can add it ourselves:
 1 declare global {
 2   const requestIdleCallback: (
 3     callback: () => void,
 4     options?: {timeout?: number},
 5   ) => number;
 6   const cancelIdleCallback: (callbackId: number) => void;
 7
 8   interface Window {
 9     requestIdleCallback: typeof requestIdleCallback,
10     cancelIdleCallback: typeof cancelIdleCallback,
11   }
12 }
Typed CSS and foovar fork
Now a bit more complicated conundrum is to use types for CSS. Typed CSS classes could be exported by typed-css-modules for a long time already, but running console tool tcm in a neighboring terminal in parallel with webpack is so unhandy. We could fetch typed-css-modules-loader, but due to the asynchronous writing on the disk TypeScript can swear at non-existent modules. So what should we do? I just wrote my own loader, which writes *.d.ts synchronously. I'm hearing a scream of experts, they say I shouldn't use blocking operations in the webpack loader, but you know, I didn't feel any difference for my 60 files of styles, the assembly process remained fast. Moreover, I didn't even use DtsCreator from typed-css-modules to generate types and parse class names by a regular expression. It looks like this:
1 const source = '.red {color: blue}';
2 const classNames = source
3   .replace(/('|").*?\1/g, '')
4   .match(/\.-?[_a-zA-Z]+[_a-zA-Z0-9-]*/gm);
5 const uniqueClassNames = Array.from(new Set(classNames || []));
Yeah, I like everything simple, and this bicycle has worked as Swiss watches during all the development of my project.
Now we need to export data from Stylus to TypeScript. There is an artisanal library foovar, intended to write variables from *.styl to *.js, but its format is quite specific. Instead of the object, this library provides the complicated structure of getters, that return values, and units. I forked the package and added the new mode tree, which generates an ordinary object together with types (if the option types was set). It even works, thank goodness.
How to write HOC
I don't remember how many articles I read about writing higher-order React components in TypeScript, but there was a feeling all of them retold the same things, because finally, I had to invent my solution. How is that possible? It happens because often the articles and the code are written by different people. Perfect HOC must satisfy a number of conditions:
- HOC must be compatible both with classes and function components.
- HOC must be able to be chained with other HOC as in the example
withClassName (withI18n(Component)). - HOC must preserve static methods and properties of the component; and its types.
- HOC must preserve public methods and properties of the component; and its types.
- HOC must be able to provide new static methods or properties.
- HOC must be able to provide new public methods or properties.
- Passed to HOC
refmust store finally modified component. - It must be possible to indicate the type of modified component for
React.createRef.
Genuinely jealous of developers, who found a simpler approach to implement all the requirements above. For those who are still cautious with decorators because of TypeScript I share solution for version 3.6.2.
  1 import React, {PureComponent} from 'react';
  2 import hoistNonReactStatics from 'hoist-non-react-statics';
  3
  4 type ConstructorInstanceType<
  5   TProps extends {},
  6   TComponent extends React.JSXElementConstructor<TProps>
  7 > = TComponent extends (
  8   new (props: TProps) => React.Component<TProps, any>
  9 )
 10   ? InstanceType<TComponent>
 11   : React.ReactElement<TProps, TComponent>;
 12
 13 type Wrapped<TProps extends {}> = React.JSXElementConstructor<TProps>
 14   | {
 15     WrappedComponent: React.JSXElementConstructor<TProps>,
 16   }
 17   | {
 18     WrappedComponent: {
 19       WrappedComponent: React.JSXElementConstructor<TProps>,
 20     }
 21   }
 22   | {
 23     WrappedComponent: {
 24       WrappedComponent: {
 25         WrappedComponent: React.JSXElementConstructor<TProps>,
 26       }
 27     }
 28   };
 29
 30 type WrappedComponent<W extends Wrapped<any>> = (
 31     W extends {
 32       WrappedComponent: {
 33         WrappedComponent: {
 34           WrappedComponent: infer TComponent
 35         }
 36       }
 37     }
 38       ? TComponent
 39       : (
 40         W extends {
 41           WrappedComponent: {
 42             WrappedComponent: infer TComponent
 43           }
 44         }
 45           ? TComponent
 46           : (
 47             W extends {
 48               WrappedComponent: infer TComponent
 49             }
 50               ? TComponent
 51               : (W extends infer TComponent
 52                 ? TComponent
 53                 : never
 54               )
 55           )
 56       )
 57   )
 58 );
 59
 60 type WrappedProps<W extends Wrapped<any>> = (
 61   W extends {
 62     WrappedComponent: {
 63       WrappedComponent: {
 64         WrappedComponent: React.JSXElementConstructor<infer TProps>
 65       }
 66     }
 67   }
 68     ? TProps
 69     : (
 70       W extends {
 71         WrappedComponent: {
 72           WrappedComponent: React.JSXElementConstructor<infer TProps>
 73         }
 74       }
 75         ? TProps
 76         : (
 77           W extends {
 78             WrappedComponent: React.JSXElementConstructor<infer TProps>
 79           }
 80             ? TProps
 81             : (
 82               W extends React.JSXElementConstructor<infer TProps>
 83                 ? TProps
 84                 : never
 85             )
 86         )
 87     )
 88 );
 89
 90 type WrappedInstanceType<
 91   W extends Wrapped<any>
 92 > = ConstructorInstanceType<
 93   WrappedProps<W>,
 94   WrappedComponent<W>
 95 >;
 96
 97
 98 type AaaProps = {aaa: number};
 99
100 const withAaa = <
101   TStaticProps extends {},
102   TProps extends AaaProps = AaaProps
103 >(
104   Component: React.JSXElementConstructor<TProps> & TStaticProps,
105 ) => {
106   type Props = Omit<TProps, keyof AaaProps> & Partial<AaaProps>;
107   const TypedComponent: React.JSXElementConstructor<
108     TProps
109   > = Component;
110   const Wrapper: React.FunctionComponent<Props> = (
111     props,
112     ref?: React.Ref<ConstructorInstanceType<TProps, typeof Component>>
113   ) => {
114     const componentProps = {
115       ...props,
116       aaa: 777,
117     } as TProps;
118     return <TypedComponent {...componentProps} ref={ref} />
119   };
120
121   const WrapperWithRef = React.forwardRef<
122     WrappedInstanceType<typeof Component>,
123     React.PropsWithChildren<Props>
124   >(Wrapper);
125
126   return Object.assign(
127     hoistNonReactStatics(WrapperWithRef, Component),
128     {
129       aaaStaticNumber: 123,
130       WrappedComponent: Component,
131     },
132   );
133 };
134
135
136 type BbbProps = {bbb: number};
137
138 const withBbb = <
139   TStaticProps extends {},
140   TProps extends BbbProps = BbbProps
141 > (
142   Component: React.JSXElementConstructor<TProps> & TStaticProps,
143 ) => {
144   type Props = Omit<TProps, keyof BbbProps> & Partial<BbbProps>;
145   const TypedComponent: React.JSXElementConstructor<
146     TProps
147   > = Component;
148   const Wrapper: React.FunctionComponent<Props> = (
149     props,
150     ref?: React.Ref<ConstructorInstanceType<TProps, typeof Component>>
151   ) => {
152     const componentProps = {
153       ...props,
154       bbb: 999,
155     } as TProps;
156     return <TypedComponent {...componentProps} ref={ref} />
157   };
158
159   const WrapperWithRef = React.forwardRef<
160     WrappedInstanceType<typeof Component>,
161     React.PropsWithChildren<Props>
162   >(Wrapper);
163
164   return Object.assign(
165     hoistNonReactStatics(WrapperWithRef, Component),
166     {
167       bbbStaticNumber: 321,
168       WrappedComponent: Component,
169     },
170   );
171 };
172
173
174 type TestProps = AaaProps & BbbProps & {
175   test: string,
176 };
177
178 class Test extends PureComponent<TestProps> {
179   static staticProperty = 999;
180
181   static printStaticProperty () {
182     console.log(this.staticProperty);
183     return this.staticProperty;
184   }
185
186   publicProperty = 888;
187
188   printPublicProperty () {
189     console.log(this.props.aaa, this.props.bbb, this.publicProperty);
190     return this.publicProperty;
191   }
192
193   render () {
194     return (
195       <h1>
196         {this.props.test}
197         {this.props.children}
198       </h1>
199     );
200   }
201 }
202
203 const WrappedTest = withBbb(withAaa(Test));
204
205
206 type InlineProps = AaaProps & BbbProps & {
207   inline: number,
208 };
209
210 const Inline: React.FunctionComponent<InlineProps> = (props) => {
211   return (
212     <span>
213       {props.aaa}
214       {props.bbb}
215       {props.children}
216     </span>
217   );
218 };
219
220 const WrappedInline = withBbb(withAaa(Inline));
221
222
223 class Parent extends PureComponent {
224   private wrappedTestRef = React.createRef<
225     WrappedInstanceType<typeof WrappedTest>
226   >();
227
228   render () {
229     return (
230       <WrappedTest test='abc' ref={this.wrappedTestRef}>
231         Hello world!
232         <WrappedInline inline={123} />
233       </WrappedTest>
234     );
235   }
236
237   componentDidMount () {
238     const wrappedTestComponent = this.wrappedTestRef.current;
239     if (!wrappedTestComponent) {
240       throw 'WrappedTest cannot be used';
241     }
242
243     WrappedTest.printStaticProperty();
244     console.log(1, WrappedTest.aaaStaticNumber);
245     console.log(2, WrappedTest.bbbStaticNumber);
246
247     wrappedTestComponent.printPublicProperty();
248     console.log(3, wrappedTestComponent.props.aaa);
249     console.log(4, wrappedTestComponent.props.bbb);
250     console.log(5, wrappedTestComponent.props.test);
251   }
252 }
253
254 export default Parent;
What the hell is going on here? There are two components Test and Inline. Both are wrapped up by decorators withAaa and withBbb respectively. These decorators add public properties aaa and bbb, public ones aaaStaticNumber and bbbStaticNumber, but at the same time, preserve own properties and methods of the components. Eventually, Parent renders them and checks whether everything works properly. Please, pay special attention to auxiliary type WrappedInstanceType, used to detect the proper type of the modified component.
It seems really scary, but anything else hasn't worked for me, because I don't need HOC without ref or types at all.
helpers & hocs
Everybody is interested in auxiliary classes and functions, often migrating from project to project. Below I will tell you short descriptions of my utilities.
Color
This class is designed to work with colors. Its constructor accepts either a string or 3-4 components of a color. Instances can generate color in rgb and rgba formats, can change the alpha channel. All the colors imported from CSS automatically become instances of Color.
EventBus
This is just a typed event bus with default methods on, off and emit. This bus checks whether event handlers implement the set interface. As an example, GlobalEventBus inherits EventBus and handles events of window and document.
GlobalStorage
This class provides getters and setters for work with localStorage. It observes the data and saves it between sessions.
eventWithThreshold
Often we need to handle mousedown and touchstart events after the cursor was moved to some threshold distance. To avoid repeating the code I created the decorator, which implements such a behavior. It takes as options a handler, a threshold and an axis (x, y or xy). This helper is used 7 times across the project.
extractCoordinates
This function gets either MouseEvent or TouchEvent, and returns a pair of coordinates. So easy, but so helpful. It was used 15 times.
getRandom
Math.random is called 9 times, but getRandom even 10. The difference is that my helper takes a seed and generates the same pseudo-random numbers for the same input.
sendAnalytics
This function reacts to changes in observable and computed properties and sends typed analytics to Google. That is to say, analytics is regular, but sending an event of an undocumented category will be a problem.
withI18n
This HOC adds two new properties to any component: language and i18n. It's used across-the-board to localize the whole project:
 1 import withI18n, {I18nProps} from 'hocs/withI18n';
 2 const dictionary = {
 3   en: {hello: 'Hello world!'},
 4   ru: {hello: 'Привет, мир!'},
 5 };
 6
 7 class Component extends PureComponent<I18nProps<typeof dictionary>> {
 8   render () {
 9     return this.props.i18n.hello;
10   }
11 }
12
13 export default withI18n(dictionary)(Component);
withClassName
Yet another HOC is required to wrap the component in the extra div if className is provided. It could be modified a bit to concatenate the outer class with the internal. But such an approach brokes an encapsulation (although it's not meaningless).
webpack
Everybody is interested in how people assembly the projects. Certainly, soon a new role like Front-End DevOps will appear, because configuring development and production environments, code delivering and so on, are taking increasingly longer. And that's a good trend as automation of any repeating actions pay off completely.
I wish at the outset to say, I write the configuration for webpack in TypeScript. It makes possible to hold the complex structure of rules and plugins under the expectations of the bundler.
development VS production
Except for 5 bundles of the website, my project builds 50 bundles for 50 works, which could be opened in the virtual browser (I don't take CSS into account). Thus I have configurations for app, and iframe, for development, and production environments. Many parts of configurations look the same or at least similar. These repetitive patterns I store in separate variables and merge them by webpack-merge. To do the same trick for plugins I create factories. To make it clearer, I will write some variable names. Among others, I have baseConfigScheme, appConfigScheme, iframeConfigScheme, productionAppConfigScheme, extractStylesConfigScheme and, for example, the factory createHtmlPlugin.
webpackProxy
Sometimes you don't want to merge deeply nested structures as they tend to be broken during the development process. Sometimes you want to use different values in plugin options, but feel so lazy to write the factory. Some people override properties of options object in the production configuration, but I have gone further and created WebpackProxy.
Since then I got a bit happier:
  1 // WebpackProxy.ts
  2 const undefinedSymbol = Symbol();
  3
  4 class WebpackProxy<TTree extends Record<string, Record<string, any>>> {
  5   static expect <T extends any>() {
  6     return undefinedSymbol as any as T;
  7   }
  8
  9   private valueBranches: TTree | undefined;
 10   private symbolBranches: TTree;
 11
 12   constructor (symbolBranches: TTree) {
 13     this.symbolBranches = symbolBranches;
 14   }
 15
 16   use <TId extends keyof TTree, TRecord extends Record<string, any>>(
 17     id: TId,
 18     target: TRecord,
 19   ) {
 20     const symbolBranch = this.symbolBranches[id];
 21     return new Proxy<
 22       TRecord & TTree[TId]
 23     >(target as TRecord & TTree[TId], {
 24       get: (target, key: keyof TTree[TId]) => {
 25         if (!this.valueBranches) {
 26           throw 'WebpackProxy must be configured!';
 27         }
 28
 29         const valueBranch = this.valueBranches[id];
 30         if (symbolBranch[key] !== undefinedSymbol) {
 31           return target[key];
 32         } else if (valueBranch && valueBranch.hasOwnProperty(key)) {
 33           return valueBranch[key];
 34         } else {
 35           throw `Value ${id}['${key}'] is not defined!`;
 36         }
 37       },
 38
 39       getOwnPropertyDescriptor: (target, key: keyof TTree[TId]) => {
 40         return undefined
 41           || Object.getOwnPropertyDescriptor(symbolBranch, key)
 42           || Object.getOwnPropertyDescriptor(target, key);
 43       },
 44
 45       has: (target, key: keyof TTree[TId]) => {
 46         return key in symbolBranch || key in target;
 47       },
 48
 49       enumerate: (target) => {
 50         return Object.keys(target).concat(Object.keys(symbolBranch));
 51       },
 52
 53       ownKeys: (target) => {
 54         return Reflect.ownKeys(target).concat(
 55           Reflect.ownKeys(symbolBranch)
 56         );
 57       },
 58     });
 59   }
 60
 61   configure (valueBranches: TTree) {
 62     this.valueBranches = valueBranches;
 63   }
 64 }
 65
 66 export default WebpackProxy;
 67
 68 // webpack.config.ts
 69 import WebpackProxy from './WebpackProxy.ts';
 70
 71 const webpackProxy = new WebpackProxy({
 72   cssModules: {
 73     localIdentName: WebpackProxy.expect<string>(),
 74   },
 75 });
 76
 77 const appConfigScheme = {
 78   module: {
 79     rules: [{
 80       test: /\.styl$/,
 81       use: [{
 82         loader: 'css-loader',
 83         options: {
 84           modules: webpackProxy.use('cssModules', {mode: 'local'}),
 85         },
 86       }],
 87     }],
 88   },
 89 };
 90
 91 export {webpackProxy, appConfigScheme};
 92
 93 // webpack.development.ts
 94 import {webpackProxy} from './webpack.config';
 95 webpackProxy.configure({
 96   cssModules: {
 97     localIdentName: '[name]-[hash:base64:2]-[local]',
 98   },
 99 });
100
101 // webpack.production.ts
102 import {webpackProxy} from './webpack.config';
103 webpackProxy.configure({
104   cssModules: {
105     localIdentName: '[hash:base64:8]',
106   },
107 });
Take into account, that types in traps have no sense because we broke them, denoting target as TRecord & TTree[TId] (which is false, obviously). This is in order to force TypeScript giving the clues about proxied properties.
If I forget to set the value of some proxied property, TypeScript reports to me. If I ignore its message, WebpackProxy throws runtime error immediately.
Code Splitting
To discover the best way to split the code I use webpack-bundle-analyzer. It's clear, the directory node_modules should be separated from the code of a project, but forming the rest of bundles isn't so obvious.
All the dependencies are saved to vendor.js, the main code is located in bootstrap.js, which right away initiates loading of components Smoke.js and EffectScreen.js, that use Three.js. Also, the component OfferApp.js was set apart as it uses a very long and heavy list of cities and countries.
To display components loaded by dynamic imports I use React.lazy and React.Suspense. Nothing special, but you need to remember one detail. The component loading starts after its HOC is rendered for the first time. If you want to initiate the loading immediately, you need to call import outside the wrapper, like below:
1 import(
2   /* webpackChunkName: 'EffectScreen' */
3   'components/EffectScreen/EffectScreen'
4 );
5 const EffectScreen = React.lazy(() => {
6   return import('components/EffectScreen/EffectScreen');
7 });
DesktopScreen
We've made all the screens, except the main one, where all significant information about my experience will be published. Everything the user saw before is a show, which has no meaning. Here the real data appears and should be displayed somehow.
Let me remember that the last frame of EffectScreen was the white background, thus it should be also the first frame of the next screen. After the white flash is disappeared, the user sees an authorization form with an input, intended for typing the password. Not just an input, but an entirely animated component.
Reusable Components
Some components in the project are used multiple times. I'll describe the most interesting of them.
FancyInput
All the inputs in the portfolio are the instances of FancyInput. This component animates the caret and each character, inserted or removed by the user. To find out the letters to be shown or hidden I need to compute the difference between previous and current states, taking into account the text selection. To set the caret position I sum widths of all typed characters (of course the cache is used here).
In my opinion, the spectacularity of the effect is worth to torment during the development. Possibly, one day I will share a separate npm package FancyInput.
FancySelect
This component is designed to replace the default select box. Creating such control is much easier, but anyway it takes some time because you should implement several requirements. It should handle focus, react to mouse events (including mousewheel), support hotkeys, be able to render very long lists, find a value by typed letters... Also, the dropdown menu should be rendered on top of other components and be scrolled with the content of its container :-)
When the time comes, I will publish FancySelect to open source too.
FancyCheckbox
This is the easiest input control. All you need to remember implementing custom checkboxes are handling the focus properly, and the compatibility with a tag label.
FancyNumber
It's just a wrapper around FancyInput, which works with numbers only.
TouchArea
This component is pretty interesting and useful, it's intended to handle mousemove and touchmove events. TouchArea could be used to create some kind of slider or sidebar. It notifies the parent that the property currentProgress is changed (for any reason). If the user threw the mouse button or took the finger off the screen, TouchArea animates the value of currentProgress up to targetProgress. In my portfolio, the component is used in the authorization form, calendar, catalog, gallery, player, and to handle gestures on the virtual desktop on mobile devices.
SmartSurface
To take advantage of shaders in my portfolio I used the library gl-react, and particularly gl-react-dom. This is a great package with a couple of imperfections for my purposes, that almost made me forking it.
Firstly, it always invokes requestAnimationFrame, even if nothing happened (i.e. even if uniforms were not changed). To fix it I wrote a wrapper, which renders Surface in an active state but draws a regular canvas otherwise. But what should I draw on that canvas? Before hiding the Surface I make a snapshot with an image (thanks to developers for surface.capture()) and draw it on CanvasContext2D.
Secondly, I wish to have the only handler of requestAnimationFrame across the project. That's why I use mentioned above globalEventBus. Furthermore, my handler considers the fact the browser may be slow, it skips a frame if the previous one was rendered longer than 17 ms. Fortunately, developers of the library export the auxiliary factory createSurface, where we can override requestAnimationFrame and cancelAnimationFrame.
 1 import globalEventBus from 'constants/globalEventBus';
 2 import GLViewDOM from 'gl-react-dom/GLViewDOM';
 3 import {createSurface} from 'gl-react';
 4 import {Surface} from 'gl-react-dom';
 5
 6 const CustomSurface = createSurface({
 7   GLView: GLViewDOM,
 8   RenderLessElement: 'span',
 9   mapRenderableContent: (node: any) => {
10     return node instanceof Element ? node.firstElementChild : null;
11   },
12   requestFrame: (handler: (deltaTime: number) => void) => {
13     const once = (deltaTime: number) => {
14       globalEventBus.off('animationframe', once);
15       handler(deltaTime);
16     };
17     globalEventBus.on('animationframe', once);
18     return once;
19   },
20   cancelFrame: (once: () => void) => {
21     once && globalEventBus.off('animationframe', once);
22   },
23 }) || Surface;
As you see, the flexibility of the library allowed me to use it and to save tons of time.
Desktop Environment
If someone asked me about the most challenging task I ever faced for my career, I would frankly answer it is the window system in my portfolio. Let me introduce it to you, in all modesty, and tell about some problems I had to solve :-(
Windows could be opened, minimized and closed, could obtain and lose the focus. The user can resize and drag them, move between virtual desktops, expand leftward, rightward or fully on the whole screen. Some windows have a fixed size, some are frameless. On mobile devices "windows" turn into "applications". Lastly, there is a grid mode where all the virtual desktops are visible. In addition, such a grid with all the windows is projected to a minimap.
At the moment there is the only desktop environment realized all the features described above. That's my favorite KDE. Someday, I hope to contribute something significant to that project, but until I'm not an expert in C++ let me try to create a similar environment in TypeScript.
Architecture
The whole window system consists of three main entities:
AppFrameis a component, intended to render a window in its current state and to handle events of the user. It also renders an application fromprops.children. To change the state of the window the component just calls various methods of its own$appFrame.$appFrameis an instance ofAppFrameStore, which stores and manages the current state of a window. It's available from the componentAppFrame, from the application component, and from$interface(see below).$interfaceis the only instance ofInterfaceStore, which stores all the instances ofAppFrameStore(one per application) and manages them. Also, it controls the focus and virtual desktops.
Every $appFrame has a manager, in my case, it's always $interface. The manager provides to windows exhaustive information about virtual desktops (how many of them, which one is active, is the grid mode on), and also an interface to open, close, minimize and focus the window. Hereby all such operations are performed via $interface only.
Let's open the player, then minesweeper. Let's play the minesweeper and close it. At first sight, it might seem that the closing action affects the window only, that it is applied to, which means it should be handled in AppFrameStore. But who will get the focus of the closed minesweeper? Of course, the opened player will, and this is because the closing was actually handled by $interface. Therefore all the actions affecting the focus are delegated to the manager.
Opening & Closing
To speed up the website I decided not to render closed applications. The whole DOM tree of an application appears after the window is opened. But the inserting of such a big structure takes the time, one frame isn't enough for that; the opening or closing animation will slow down or skip the frames. The solution is to add some pause between the opening request (i.e. user event) and the animation (requestIdleCallback is used). As a rule, such a delay isn't visible to the naked eye. Let the user think an application is loading to the memory :-) That's almost true.
A DOM tree is removed, when the closing animation is finished only. Thus, if you click the icon fast enough and open the application again, you can avoid losing the data.
ExpandMode
You can expand a window fully by double click on the header or by dragging upward to the top panel. Also, the window can be expanded halfway by dragging it leftward or rightward to the corresponding edge of the screen. From halfway mode, it can be either collapsed (pull it down or aside) or expanded fully (pull it up).
To make all of these modes intuitive I added a shadow, that is expanded before the window itself and demonstrates the prospective mode if the user would release a button right now. It's now a big deal to expand the window, even with a shadow, but the collapsing is a little more difficult...
What's happening during the collapsing? Size and position are changing. Above all, computing a new position isn't so easy. The main idea is that the middle of a header must be under the mouse cursor. But if the window goes beyond the screen, we need to fit it back.
Supposable, we've computed a new position, and the window could be collapsed successfully from each of three modes (full, left and right). But there is a second issue: after the collapsing is started, the user, as luck would have it, continues moving the mouse! The position of the window is changing at the same time as CSS is animating its transition. It results in the window is moving very slowly, and the user starts supposing the interface was made not by a real programmer, but by some kind of front-end developer.
Technically there are two ways to fix the issue:
- either animate
transform, and changeleftandtopon cursor moves; - or wrap the window in yet another container, which has its own
transform.
The second one is faster, this is why I chose it. But CSS transition is just the tip of the iceberg. What coordinates should be used to position the new container? It appears, that in the normal condition the user changes coordinates of the window, but since the collapsing is started the only coordinates of the container are affected. And of course, when the collapsing is finished, we need to add container coordinates to window coordinates, return the container to its starting position, and to do those manipulations without any animation.
Resizing
The origin in the browser is a top left corner. It means if you wish to pull a right edge of the window, the property width only would change, but if a left one, then left would change as well. The same situation is on the vertical axis. Also, the size can be changed on both axes simultaneously.
So, what will happen, if the user pulls a left edge to the right? The window will reach its minimal size. Now the user pulls to the right, how to handle it? The window will reach its maximal size. Notice, the minimal size is a constant value, but the maximal depends on the direction of pulling and the window position.
What should we do, if the user would shrink the browser so much, the window doesn't fit desktop boundaries? At first, we could move the window, then we should shrink it with the browser.
Another issue is how to adapt an application to the window size? I will remind CSS rules @media don't work here. To avoid the rerendering of react tree every time the width is modified, I added computed property, changed every 100 pixels. It's quite acceptable for the view of performance.
Dragging
Dragging the window itself isn't interesting, but things are getting challenging if you want to support ExpandMode and handle switching between virtual desktops. If you push the edge of the screen by a window, a hint shadow appears. If you push it by the mouse cursor, a window flies away to the neighboring virtual desktop.
Virtual Desktop
Every window is located on a certain virtual desktop. You can change that desktop by hotkeys, or by pushing a window outside of the desktop, or by dragging a window in the grid mode. Anyway, you will see an animation of the moving from one desktop to another one. And here we face the same problem, discussed above in ExpandMode section: the position of already animated window continues to change. Thus, without thinking twice I wrapped every window in the yet another container of the virtual desktop and animated it instead of the window itself.
VirtualDesktopSwitcher
The window system is done already. Now we need to add a switcher of the virtual desktop. Double click (or click by the right mouse button) should activate the grid mode (zoom out virtual desktops). Click on a virtual desktop should exit the grid mode (zoom in an activated virtual desktop). It looks, we can just add transform: scale(0.5) and transition: transform. It's as brilliant as simple, the switcher works exactly in such a way.
The only tiny trivial task remains, that is to display thumbnails of opened windows as colored squares. But wait for a second, what will happen with them on the collapsing? The position and size of the square will change... What will happen on the virtual desktop switching? Oh... Well, let's wrap every square in two containers and repeat all the tricks already applied to windows. The browser doesn't make the difference between the thumbnail and the full-featured window, so the switcher inherits the entire complexity of the window system.
That's sad, but on the other hand, the user could think the project was made by a real programmer, but not by some kind of front-end developer.
Calendar
Can you guess, what I love Microsoft for? Besides TypeScript and minesweeper, they are first, who created a well-designed calendar, where you can zoom in a year and see the months, zoom in a month and see the days, where you can scroll the ribbon of the days continuously, and one month is turning into another. It was a real revolution on the market of the calendars for its time! So sad, that such a market doesn't exist and nobody even noticed the new sparkling calendar in Windows 7.
So let's not fall behind Microsoft on our websites and start creating handy and intuitive calendars. Then people, not just robots, will use them.
CatalogApp
A catalog is one of the most important applications, this is an entry point where the user starts discovering my portfolio. If it had been unattractive or unhandy, nobody would have read about my former experience as everybody cares about money only.
I classified all my projects by the time they are created and got 9 categories (8 years + my favorite). Every category contains up to 12 works. And also I decided to add the search. And 3D switching between the categories. And the smoke lit by projectors. But first things first.
Categories
At first, we need to implement switching between the tabs. The catalog will have the main property currentProgress influencing all the styles. The value 0 means the first category, 100 the second, 200 the third... Let's use the already mentioned component TouchArea to handle and animate currentProgress via mouse and touch events. Let's calculate opacity and transform (translate3d and rotate3d) for each category depending on the property currentProgress. Let's diminish sensitivity for the edge tabs. Done!
It's time to test our solution. Let's switch a tab from 2019 to 2018. Cheers, it works! Now click on 2014... Oh, no, things are broken. During the transition, we saw 2017, 2016 and 2015 years. To fix the slider we need to display only the current and the next categories and consider the difference between indices, calculating the styles.
Search
Now we should deal with the search. It could be said, the search is a special category, activated when the input field gets non-empty. At that moment, the rest categories are going away upward, and the search category is appearing from below. To make it tidy let's combine linear-gradient and CSS property mask-image, supported by browsers since October 2017.
As the user types characters, projects of search category appear, move and disappear. This effect never gets obsolete as it ideally visualizes the essence of search, and no less important can be easily implemented by CSS transition.
Smoke
It remains to draw a charming background with realistic smoke. But how? Frequently, in place of real smoke, turned towards the camera sprites are used in 3D games. Developers delude the player: instead of visualizing a real physical model, they just show flat images, spin, shrink and stretch them. And people believe they see the real smoke.
Web programmers manage even fewer resources than game developers, so we are going to cheat as well. Let's create 100 flat planes and apply a smoke texture to each one, then scatter them around the screen and animate. Also, we need to add 2 sources of the light revolving around the center and take a look at the result.
Wow! The scene is as breathtaking as slow. It's time to start an optimization journey, what can we do?
- Increase every sprite 10 times and remove 90% of planes. Much better, but even 10 remained images turn on a laptop cooler.
- Reduce the resolution of the smoke texture 2 times. Apparently, it helped, so reduce it 2 times more. It helped again, so repeat the trick. No, it's no longer the smoke. It seems an optimal size is 64 pixels.
- What's else? Reduce canvas size 8 times and stretch it, because casting the rays to the 3D camera is more expensive than scaling a flat image. It works, but only due to the fact we draw the smoke because the image sharpness plummeted.
- The catalog is almost usable but sometimes frames are skipped yet. Slow down the animation of the smoke and wrap the render function in
throttlewith 100 ms.
Luckily, efforts made above haven't been in vain, and after all, behind the tabs and logotypes of projects, the stylish realistic smoke swirls. By the way, how are logotypes made? There is a component WorkLogo responsible for them, which will be discussed below in the section about shaders.
ResumeApp
The resume consists of encoded sections with text information stored in resume.json, and CCTV component. If you hover the cursor over the section, it's decoding, and finally, you see the data in the chosen language. Also, the upper section contains links to my accounts in social networks, and links to download in different formats my resume, generated automatically and based on the same resume.json (read below about AutoResume).
(De|En)coder
At first, we need to realize the effect of encoding and decoding. Apparently, each section should have the personalized parameter responsible for the encoding progress. Let's call it probability as it's the probability an arbitrary character in the section is encoded. The value 1 means all the characters are encoded, but 0 guarantees nothing is encoded.
Each section is represented by the complex DOM tree that contains strings not related to each other. We wrap all the strings in a component Encoder but how to encode them by the only parameter? For such cases, developers of React came up with the context which could be used cheaply. Let's wrap the section in context.Provider, and each string in context.Consumer.
Now the task is a bit less trivial. We need to come up with an algorithm inside Encoder transforming the original string to partially encoded, in accordance with the parameter probability. Let's split the string to characters, and generate a random number for each one. If such a number is more than probability we don't need to encode anything and should display the source character. If less, we need to pick up a random symbol from the alphabet. By the way, don't try to avoid using the alphabet here because some symbols lead to undesired line breaks and destroy the layout. We aren't going to add such symbols to the alphabet :-)
To always get the same animation we should replace Math.random to getRandom with the predictable output (see helpers & hocs), and round probability to the nearest 0.2. In addition to a stable result, determined values of probability allow us to add the cache for strings already encoded before.
Let's demonstrate all this together:
 1 // contexts.ts
 2 export const encoderContext = createContext<number>(0);
 3
 4 // Encoder.ts
 5 import React from 'react';
 6 import {encoderContext} from './contexts.ts';
 7 import getRandom from 'helpers/getRandom';
 8
 9 type Props = {children: React.ReactText | React.ReactText[]};
10 const abc = [
11   'abcdefghijklmnopqrstuvwxyz',
12   'ABCDEFGHIJKLMNOPQRSTUVWXYZ',
13   '0123456789@#$%^*()_',
14 ].join('');
15 const cache: Record<number, Record<string, string>> = {};
16
17 const Encoder: React.FunctionComponent<Props> = React.memo(
18   ({children}) => (
19     <encoderContext.Consumer>
20       {(encoderProbability: number) => {
21         const array = children instanceof Array
22           ? children
23           : [children];
24         let source = '';
25         array.forEach((a) => {
26           if (typeof a !== 'number' && typeof a !== 'string') {
27             throw 'Invalid child type!';
28           }
29           source += a;
30         });
31
32         const key = Math.round(encoderProbability * 20) / 20;
33         const probabilityCache = cache[key] || {};
34         if (probabilityCache.hasOwnProperty(source)) {
35           return probabilityCache[source];
36         }
37         cache[key] = probabilityCache;
38
39         let prevCharCode = source[source.length - 1].charCodeAt(0) || 0;
40         const cipher = source.split('').map((sourceCharacter, s) => {
41           const sourceCharCode = sourceCharacter.charCodeAt(0);
42           const i = sourceCharCode + source.length * 0.01 + s * 0.1;
43           const isChanged = getRandom(i) < key;
44           const speed = 1 + 2 * getRandom(sourceCharCode - s);
45           const seed = s
46             + source.length
47             + sourceCharCode
48             + prevCharCode
49             + Math.floor(key * speed * 5);
50           const index = getRandom(seed);
51           const newCharCode = Math.floor(abc.length * index);
52           prevCharCode = newCharCode;
53           return isChanged ? abc[newCharCode] : sourceCharacter;
54         }).join('');
55
56         probabilityCache[source] = cipher;
57         return cipher;
58       }}
59     </encoderContext.Consumer>
60   )
61 );
62
63 export default Encoder;
64
65 // Section.ts
66 import React from 'react';
67 import {encoderContext} from './contexts.ts';
68
69 const Section: React.FunctionComponent = () => (
70   <encoderContext.Provider value={0.5}>
71     <Encoder>Hello world!</Encoder>
72   </encoderContext.Provider>
73 );
74
75 export default Section;
Pay attention to the variables isChanged and seed. Computing them, we intentionally engage arbitrary parameters not related to each other. This trick allows encoding the same symbol differently, depending on its environment.
Television
A component Television renders the video of CCTV. To switch the camera spectacularly I distort the space and add the noise, using GLSL. But a shader requires resources thus, if TV isn't visible due to the scroll position, updating the picture makes no sense. To detect whether the component is visible or not I use IntersectionObserver.
When the resume is closed, the video is removed from the DOM tree. Therefore, when the application is opened again, I had to rewind the time forward (or backward as it's looped).
 1 const startTime = Date.now();
 2 class Television {
 3   /* ... */
 4   private handleVideoDurationChange = (
 5     event: React.SyntheticEvent<HTMLVideoElement>,
 6   ) => {
 7     const {currentTarget} = event;
 8     if (!currentTarget.duration) {
 9       return;
10     }
11     const elapsedTime = 0.001 * (Date.now() - startTime);
12     currentTarget.currentTime = elapsedTime % currentTarget.duration;
13   }
14   /* ... */
15 }
Adaptive Layout
As it's said before, there is no way to use @media to adapt a layout of the application. This is why I created computed property width100 changing every 100 pixels. While the user resizes a window gradually, the application fits its window in the same way, as the adaptive website fits the browser window. But if the user expands or collapses the window, the value of width100 is set instantly, and real geometry changes over time, animatedly. It leads to the broken layout, and unlikely makes people excited (with the exception of testers).
To avoid awkward situations the application always utilizes the larger value of width100 during the animation. That means, when the resume is expanded, the layout is adapted at the beginning of an animation, when it collapsed, at the end.
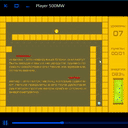
PlayerApp
Creating a video player isn't much fun, surely. Fortunately, I've finished it already, and now I'm going to tell how it was.
Icon
As the development of the player is so boring I started with an icon. Let's turn using CSS transition two sticks, those mean pause, to one triangle, that means play. Great, it will be the core of the player.
Controls
Let's put off the development for a couple of days to create all the controls: buttons, a timeline, a volume slider, a sidebar with a list of video files. By the way, the animated sorting is required to be added there, in the sidebar.
For such a purpose I installed a package react-sortable-hoc and wrote my own wrapper around it. The deal is that the library animates items within a list only. If you throw a being sorted item anywhere it takes a position instantly. But the users want animation, and they will get it!
SmartSurface and video
It's time to develop the player itself and to integrate innovative solutions.
The first thing I wish to do is to add the property isPlaying to the store $player, but actually, it's a bad idea. Such a flag is excessive because the current state of the video is presented by videoNode.paused already. Better, I would add the property shouldBePlaying. During the loading, a video stream could be paused. Despite this fact, most of the time, we need to know the state of the player, but not of the video element itself. In other words, should the video be playing?
Also, we need to bear in mind, that every time a new video element is created, its volume must be set in accordance with the settings of the player.
Ultimately, it's a turn of innovations. After the video gets paused or played we will render an astonishing wave effect using GLSL and SmartSurface mentioned above. The shader itself is described in the corresponding section; here I'm going to tell about a couple of tricks only.
Firstly, we don't need to run the shader at idle. While the user is just watching a video, we render the only element video without any complication. But if the video is paused, things get changed.
Secondly, the initialization of WebGL context takes some time. It's quick, but not instant, and that pause is noticeable by the naked eye. It's unpleasant to watch an effect after a delay of 100-300 ms. Therefore the context is held all the time but updated on-demand only.
And thirdly, we need somehow to export the captured frame to the shader for the processing. The library gl-react is capable of this out of the box, but there is trouble in Firefox. I don't know if the browser after rewinding draws a frame with the delay because of the nature of caching or rendering, but the fact is an empty array instead of image data is provided to the shader. When it happens, the user sees the background behind the video replaced by the processed frame in the next moment. As a workaround solution, I draw the frames on a dedicated canvas and use the data of the canvas in the shader. In this way, I don't clean the canvas ahead of time, as the browser does. So a fix is easy enough, but how much time is required to think it up?
BrowserApp
My browser is extremely simple, it looks rather like WebView. It underachieves even at Internet Explorer, and the similarity to Opera or Vivaldi remains just a pipedream. Nonetheless, it has tabs, speed dial panel, and address bar.
Speed Dial Panel
Let me remember all the applications can potentially have the size from 320x240, and up to infinity. To reduce suffering, making the adaptive layout of speed dial, I used flex-flow: row wrap. Those projects, that don't fit visible lines, are merely cut.
To reduce the number of DOM nodes and to speed up the rendering of the browser application I replaced all the pins around projects' icons to SVG images. After that, instead of 5 rectangles, I have 1 image only... Consisting of 5 elements rect :-) Currently, at least, I have some wiggle room and can replace horizontalPins0.svg to horizontalPins0.jpg.
Sortable Tabs
Recently added and removed tabs are animated by the component Animate from the package rc-animate. In addition, they should be sortable, at that animated during the sorting. As you remember, I created a wrapper around react-sortable-hoc to animate the sorting of files in the player sidebar. The same wrapper I use here but sort the tabs along the horizontal axis.
Animated tabs are very entertaining, but there is much more interesting detail. Every tab is connected to its own store where a title, an address, a loading state, and a loaded page are stored. Also, those stores manage the page loading process withing iframe. When the tab is switched, the address bar is completely recreated and the user always sees an address, bound to the tab. But inactive elements iframe are just hidden to preserve already loaded pages. It turns out if iframe is hidden by display: none the scroll position is lost, but if visibility: hidden is used, anything works as expected.
Loading of iframe
What can I tell about, except for srcdoc and src? Let's start with the fact the first attribute behaves differently depending on the browser. Some browsers deny access from srcdoc to the parent document as they think documents have different origins.
Okay, I could set src but in such a scenario the document is displayed as soon as it's loaded. Before that, I want to execute a script. I could insert that script to each document on the stage of the bundling. But what happened if the user tried to load a non-existent page? Should we create a new iframe with an error? It would complicate things even more.
The easiest and the most flexible solution here is loading a special placeholder empty.html via src, and further communication with it via postMessage. That is, the script, included to the placeholder, sets global variables beforehand, and then, when the parent sends a message, inserts the content to body. If the page can't be loaded for any reason, an error arises immediately, when the response of AJAX request is received. It means, to display an error, the parent just sends postMessage with the corresponding content.
Imagine, the user is loaded the page A, read a tedious description of some project, and now hopes to find something more exciting on the page B. He/she types a new URL in the address bar, presses the enter key, and triggers the loading of the document B. So the previous document doesn't exist already, and the new one doesn't exist still. The user rethinks and cancels the loading by clicking on the cross icon. The address bar returns to the previous state, and the previous document A starts the loading again. All that time a white page only is visible for the user. Eventually, document A is loaded, and the white screen is switched to the boring project description.
To make all the mess described above seamless it's necessary to use two iframe elements per tab.
Inside iframe
The same react and react-dom are used inside the loaded pages. It means, adding them to each bundle makes no sense as we can borrow the libraries from the parental document.
Every page is an application based on one of the five templates. Also, there are a bunch of auxiliary components to describe a project in one manner. Such an approach saves time when you need to add new content to the portfolio.
All the project descriptions are presented in two languages: Russian and English. In contrast to the parental application, the locale here is switched via CSS.
Portfolio within portfolio
Yo Dawg, I herd you like the portfolio, so I put a portfolio in portfolio so you can see portfolio while you explore the portfolio. © Xzibit
To be serious, one of the projects is the portfolio itself, which could be opened in the virtual browser. Some elements are hidden or simplified in iframe mode, but in general, I hadn't any difficulties with the recursion. The only bug I found, is the library Web Font Loader doesn't work in Firefox within iframe.
Autosuggest
Autosuggest became the icing on the cake browser. Dropdown in the address bar is animated and supports hotkeys. The matches, found in the URL, are marked with a bright color.
To avoid the conflicts, hotkeys are handled depending on the state of the autosuggest: if the dropdown menu is opened, it handles keyboard events, otherwise, the browser does.
OfferApp
I think about 99% of recruiters visit the portfolio with the only purpose: find and download my resume. They could do it opening ResumeApp in 4 different formats, and in 2 languages. But I decided to go one step beyond, and create an application, where you can send a job offer just from the website.
Ameba
I suggested to a graphics designer to draw a couple of screens for my wizard and asked not to consider technical limitations. When I saw a mockup I got the doubts, but it was too late. I had to render a certain substance, where drops fly off from, and the conical gradient over that, oriented towards the mouse cursor.
Okay, I saw something similar already and was so happy to spend just an evening for creating ameba in SVG. It was so lovely but so slow. All the same, 20 FPS hurt the eyes. I tried to optimize filters and masks, to reduce the size of the ameba but gained 25 FPS only. That's better, but still not impressive.
Well, it's time for plan B. So good, when you have it. I saved ameba to the separated file Ameba.html, and colored it to white color on a black background. Then, I replaced all the timings to the dividers of 12, recorded a screencast of duration 12+ seconds, and cut the first 12 seconds. As you probably guessed, I made a looped grayscale footage. Over that footage I superimposed a gradient image with mix-blend-mode: multiply. Finally, the rendering had been optimized up to 60 FPS, but an effect is still slow. How is that possible? Of course, this is because I recorded the screencast on the same laptop, and SVG slowed down during the recording. Let's multiply all the timings to 5 and record a new video to speed up it 5 times. Done!
You need to be careful playing with blend modes in the browser. For example, when the gradient rotates, some kind of nasty blinking appears on the edge of an image in Firefox. The bug can be treated by placing the image in a container with a black background.
PoliticalMap
In the second step, the head recruiter fills information about the company, including its geological location. Actually, I have to insert a map here, but where should I get it? Google Maps and Yandex.Maps don't provide an API to select or highlight the country. I could determine it by the click coordinates, but it would be so ugly (both on the map and in the code). I would better prefer to obtain somewhere borders of the states in SVG... And yeah! There are such maps on simplemaps.com and amcharts.com.
It should seem, that's enough to download and insert SVG, but the user expects to be able to scale and drag the map on both desktop and mobile devices. And what happens when the country is selected? Apparently, somewhere in FancySelect the name of the country appears in the language of the interface. Also, it would be a good idea to substitute the capital of the country in a corresponding input field.
Shortly, the rest of the day I manually made a table of country codes, names, and capitals in two languages. Finally, the list consists of 176 countries. If it turned out, that the state is missing in the list, the user can select "other country". But how to sort the items to raise this option to the first position? We could append it manually after the sorting, but there is a trickier solution. An invisible character \u000c is located before all the letters of the alphabet, so we just need to add it in the beginning of the string.
PinchPanZoom
Surprisingly, I haven't found a ready-to-use component to scale the content in the browser, working on both laptops and mobiles. So I had to write it on my own, and I'm going to publish it a bit later. Let me tell you about small interesting detail, which I encountered during the development.
To scale the content I use CSS property transform: scale(5). In this connection, a bug appears in Safari. This browser doesn't consider the transformation of SVG and renders it as the raster image. That's why the map gets blurred. To make America it sharp again we need to scale down a giant map, instead of scaling up a small one.
Focus
Focus management is pain, always. Initially, you think, it's enough to set tabIndex={-1} for inactive controls, and tabIndex={0} for active ones. Then you remember, it's a good rule to set focus to the first input on the active step. Later, you've figured out, that the focus affects the scroll position of the form, and as you use react-custom-scrollbars, the property scrollTop of another DOM node is set (instead of the form itself). To handle such uncontrolled behavior I had to listen to scroll events, and "carry over" the scroll position from one node to another.
Google Cloud Functions
It's time to send the form, and till the moment we didn't have the server, except for webpack-dev-server or nginx. Actually, I don't want to create a server for the sake of sending the only form, as it would complicate an infrastructure.
Let's go back in time. Once I made a fun game for the contest by Tinkoff bank and won a HolyJS conference pass. Unfortunately, after four presentations I went out for a breather and vomited a couple of times. Then I ended up in St. Petersburg Botkin Hospital with poisoning (don't think bad about the conference, it was cottage cheese from a grocery store). Well, among those fours, there was one presentation about AWS Lambda by Marina Mironovich.
I remembered about it and decided to write own container on Google Cloud Functions, which would receive requests and send the letters to my e-mail.
 1 const nodeMailer = require('nodemailer');
 2
 3 exports.sendJobOffer = (request, response) => {
 4   response.setHeader('Access-Control-Allow-Origin', '*');
 5
 6   if (request.method !== 'GET' && request.method !== 'POST') {
 7     response.status(405).send(request.method);
 8     return;
 9   }
10
11   const transport = nodeMailer.createTransport({
12     host: 'smtp.gmail.com',
13     port: 465,
14     secure: true,
15     auth: {
16       user: process.env.GMAIL_USERNAME,
17       pass: process.env.GMAIL_PASSWORD,
18     },
19   });
20
21   const mailOptions = {
22     from: process.env.GMAIL_USERNAME,
23     to: process.env.GMAIL_USERNAME,
24     subject: 'New Job Offer',
25     html: request.body || '',
26   };
27
28   transport
29     .sendMail(mailOptions)
30     .then(() => {
31       response.status(200).send();
32     })
33     .catch((error) => {
34       response.status(500).send(error);
35     });
36 };
And holy JS, it works! Surely, real code is a bit longer, because I check every request by hash, computed both on the client and the server. This protection from the spam is only symbolic since if a hacker wants, he can read obfuscated code on the client, compute the hash of the content, and... Eventually, he could send me a custom letter. I only hope the cost of the attack will exceed its profit :-)
ViewerApp
Like the browser, a gallery isn't too functional. It allows to slide the images, scale and drag them. All the listed features are implemented by the shader in GLSL.
Unlike the player, which handles a few waves at the same time, the shader of the gallery processes only the current and the next images. If the user slides an image before the transition is finished, a special Bus from the package gl-react is provided to the shader. That bus will contain an unfinished animation.
This approach has the only significant disadvantage. If the user clicks on the right button after the left button, the animation doesn't invert its direction. Instead of that, a new effect will be drawn over the old one. Such a behavior looks a bit unnaturally, but to fix it, I have to spend much more time. Perhaps, I will work on the gallery in the future, but now it's alright.
On the one hand, the transition between the images, realized in GLSL, gives the programmer almost unlimited possibilities to unleash creativity. On the other hand, inside the shader CSS doesn't work for some reason, thus we can no longer control the layout. For example, if the gallery window is expanded or collapsed, the canvas isn't going to be updated synchronously with CSS transition. That's why the user doesn't see the image during the window animation :-(
MinesweeperApp
Now is a little bonus for those, who read scroll down here: I'm going to tell you, how to write the minesweeper. Yeah, it will be the same as it was in Windows 95, but running in the browser. To reach 60 FPS we will draw cells on canvas. And what is more, we don't need to redraw all the cells, often it's enough to update the only one. I don't want to sharpen the focus on sprites loading or using drawImage or handling mouse events on the canvas. Instead of those well-known things, I will show you two crucial algorithms of the game.
Field Generation
The game starts with the field generation. We need to bury a certain number of mines. Let's not reinvent the wheel, a field of 16x16 cells should contain 40 mines. Every cell can be with the mine or without, can has the flag or has not, can be dug out or not. Also, we are going to count the number of mines around the cell, and it would be better to cache that number. Based on the above, I suggest the following code to generate our field:
 1 type MinesweeperCell = {
 2   hint: number,
 3   hasMine: boolean,
 4   hasFlag: boolean,
 5   isDisclosed: boolean,
 6 };
 7
 8 let mineCount = 0;
 9 const flagCount = 40;
10 const fieldResolution = {x: 16, y: 16};
11 const field: MinesweeperCell[][] = [];
12
13 for (let x = 0; x < fieldResolution.x; x++) {
14   const column: MinesweeperCell[] = [];
15   for (let y = 0; y < fieldResolution.y; y++) {
16     const cell: MinesweeperCell = {
17       hint: 0,
18       hasMine: false,
19       hasFlag: false,
20       isDisclosed: false,
21     };
22     column.push(cell);
23   }
24   field.push(column);
25 }
26
27 while (mineCount < flagCount) {
28   const x = ~~(Math.random() * fieldResolution.x);
29   const y = ~~(Math.random() * fieldResolution.y);
30   const cell = field[x][y];
31   if (!cell.hasMine) {
32     cell.hasMine = true;
33     mineCount++;
34   }
35 }
In the worth case, the user will wait for the field generation for ages. But as a rule, the algorithm executes within 1 millisecond. Well, I'm going to take a chance and deploy it on production.
By the way, the code could be a bit faster, if we begin to arrange the mines in the first loop. But anyway, this trick won't help to get rid of while completely:
1 const probability = 1 / fieldResolution.x / fieldResolution.y;
2 let hasMine = false;
3 if (mineCount < flagCount && Math.random() < probability) {
4   hasMine = true;
5   mineCount++;
6 }
Cell Disclosure
Probably, it's even more interesting to "dig out" the cells, when the user clicks on them. Primarily, because this process is a chain reaction.
 1 let disclosedCellCount = 0;
 2 const discloseCell = (x: number, y: number) => {
 3   const cell = field[x][y];
 4   if (cell.hasFlag || cell.isDisclosed) {
 5     return;
 6   }
 7
 8   disclosedCellCount++;
 9   cell.isDisclosed = true;
10
11   if (cell.hasMine) {
12     alert('You lost!');
13     return;
14   }
15
16   const xl = Math.min(fieldResolution.x - 1, x + 1);
17   const yl = Math.min(fieldResolution.y - 1, y + 1);
18   for (let xc = Math.max(0, x - 1); xc <= xl; xc++) {
19     for (let yc = Math.max(0, y - 1); yc <= yl; yc++) {
20       const checkingCell = field[xc][yc];
21       if (checkingCell.hasMine) {
22         cell.hint++;
23       }
24     }
25   }
26
27   const cellCount = fieldResolution.x * fieldResolution.y;
28   if (disclosedCellCount === cellCount - flagCount) {
29     alert('You won!');
30     return;
31   }
32
33   if (cell.hint === 0) {
34     for (let xi = Math.max(0, x - 1); xi <= xl; xi++) {
35       for (let yi = Math.max(0, y - 1); yi <= yl; yi++) {
36         discloseCell(xi, yi);
37       }
38     }
39   }
40 }
The first loop is intended to calculate a number of mines around the cell. If there are no mines, the second loop disclosures all the neighboring cells. That's a recursion!
Boom
In the end, let's add a little smoke from the mine explosion. Despite of the canvas we already have, the easiest way to do that is using a raster sprite and CSS timing function steps:
 1 .explosion
 2   display: none
 3   position: absolute
 4   size: 90px
 5   background: no-repeat url('/images/apps/minesweeper/explosion.png')
 6   background-size: 400% 300%
 7   transform: translate(-50%, -50%)
 8   pointer-events: none
 9
10   .lose &
11     display: block
12     animation: explosionAnimation 500ms steps(1, end) forwards
13
14 @keyframes explosionAnimation
15   for f in (0..11)
16     {8.33% * f}
17       x = (33.333 * (f - 4 * floor(f / 4)))%
18       y = (50 * floor(f / 4))%
19       background-position: x y
20
21   100%
22     background-position: 200% 200%
As you see, I used the power of Stylus to calculate background coordinates. Don't get me wrong, firstly I created 12 frames manually, but as the time to write this article came, I replaced them to the complex loop.
GLSL
So sorry, I don't use JS on my blog and can't collect the analytics. It would be interesting to know, how many readers came here from above, and how many from below. Keep calm, it remains only to deal with the shaders, and DesktopScreen will be completed. To understand the code below better I highly recommend you to read this awesome unfinished book and look at works of Patricio Gonzalez Vivo.
For those who haven't enough time I should make a little introduction. A shader is a program compiled to be running on GPU. There are vertex shaders, that modify the geometry of 3D objects, and there are fragment ones, that process pixels. We will touch only fragment shaders here. The main advantage of shaders is parallel execution, which means we can run the same program for each vertex or pixel simultaneously. Based on this, there is no any possibility to use the results of the calculation for the neighboring pixels.
Except for the pixel related data, like a variable gl_FragCoord with coordinates, the shader can use read-only data, located in a memory, that is the same for all the pixels (so called uniforms; among other things textures will be stored there). The most variables in GLSL are in the range of 0. to 1., there are a lot of built-in functions, sharpened for these boundaries. To paint a pixel from the shader we need to set the variable gl_FragColor to the corresponding value within the procedure void main.
There are other shader languages, like ARB, Cg, MSL, besides GLSL, but all of them are not supported by WebGL. Also, you should know, to compile the shader we pass a string to the method gl.shaderSource, and thus webpack doesn't minify its code. Recently one well-known company left a couple of curious comments in their vertex shader. Actually, nothing bad happened, just keep it in mind.
UserAvatar
Let's start with an ordinary shader of switching user avatars, written for the component from react-gl-transition. This component takes via props two images, transition progress and a piece of shader code. That piece will be concatenated with the template of the library and compiled as the self-sufficient shader. An elementary transition code for the mentioned library looks like:
1 vec4 transition(vec2 uv) {
2   return mix(getFromColor(uv), getToColor(uv), progress);
3 }
We wrote the function transition, that takes canvas coordinates (uv.x from 0. to 1., and uv.y from 0. to 1.) and returns some intermediate color. The variable progress is a uniform in range of 0. to 1.. Both functions, getFromColor, and getToColor, are predefined by the library and return the color of a corresponding image pixel. And finally, mix is a built-in GLSL function mixing numbers (and particularly numbers in vectors, that represent colors).
Let's complicate an example and look at a real shader, used on the website:
 1 vec2 getOffset (float progress, float y) {
 2   return vec2(0.05 * progress * cos(10.0 * (progress + y)), 0.);
 3 }
 4
 5 vec4 transition (vec2 uv) {
 6   vec4 fromColor = getFromColor(uv + getOffset(progress, uv.y));
 7   vec4 toColor = getToColor(uv + getOffset(1.0 - progress, uv.y));
 8   vec4 color = mix(fromColor, toColor, progress);
 9   float flash = sin(progress * 3.14);
10   return color * (1. + flash);
11 }
To imagine what's happening here we need to understand how the shader reacts to different values of progress. When the progress is zero, the variable fromColor contains the original color of the first image pixel with the coordinates uv. At the same time, toColor is the color of the second image pixel, shifted a certain distance left or right. Moreover, the shift has such a value, left and right edges of the image follow sinusoid. But we don't see it still because mix just returns fromColor because the value of progress is 0.
The more the value of progress increases, the stronger the first image is distorted, and the weaker the second is. After the middle of a transition, mix will get less from the first texture and more from the second one. Finally, progress will reach the value 1, and the variable color will store toColor, which is the color of the second image without distortion.
And the last touch is a flash in the middle of the effect. To make it I multiplied the variable color to 1. + flash. Notice that the sine of 0., as the sine of π are equal to 0, but the sine of π/2 is 1. It means the maximal brightness is reached exactly in the middle of the way when progress is equal to 0.5.
WorkLogo
You don't need writing all the shaders on your own from scratch. There is a package gl-transitions I borrowed shader for the component WorkLogo from. Let's try to understand, what's going on inside:
 1 uniform vec2 direction; // [-1, 1]
 2 const float smoothness = 1.0;
 3 const vec2 center = vec2(0.5, 0.5);
 4 vec4 transition (vec2 uv) {
 5   vec2 v = normalize(direction);
 6   v /= abs(v.x) + abs(v.y);
 7   float d = v.x * center.x + v.y * center.y;
 8   float m = 1.0 - smoothstep(
 9     -smoothness,
10     0.0,
11     v.x * uv.x + v.y * uv.y - (d - 0.5 + progress * (1.0 + smoothness))
12   );
13   vec4 from = getFromColor((uv - 0.5) * (1.0 - m) + 0.5);
14   vec4 to = getToColor((uv - 0.5) * m + 0.5);
15   return mix(from, to, m);
16 }
You don't seem to have any ideas, however like mine. But if we experiment a bit, some patterns can be discovered. For instance, visualizing vec4(vec3(m), 1.) we see a crawling diagonal gradient responsible for the smooth transition between the images. But the same variable is used in image distortion as it's a multiplier of the centered uv-coordinates. Now, anything is clear: every pixel is scaled relative to the image center, and in accordance with the brightness of the diagonal gradient. The gradient is black-white for the first image and white-black for the second one. And by the way, it's also used as a mask for the smooth transition.
Hm, but wait for a second, what two images are we talking about? The truth is that we have one logotype only, but nobody has forbidden us to put the same image to both uniforms.
Television
Instead of a static avatar in my resume, I decided to film a short video and loop it (as magic newspapers do in Hogwarts). But the essence of the idea is that the user will be able to switch a camera and look at me from different angles. By the way, here is the first task to think about: how to synchronize the timeline of three video elements? Elementary, that's enough to join all the fragments to one footage :-)
So now we're going to create a shader without react-gl-transition. In place of the function transition we will use the procedure main, in place of return the variable gl_FragColor will be.
 1 #define pi 3.1415
 2 #define magic 43758.5453123
 3 #define cameras_count 3.0
 4
 5 varying vec2 uv;
 6 uniform float u_time;
 7 uniform float u_video_id;
 8 uniform sampler2D u_texture;
 9
10 float get_random (float x) {
11   return fract(sin(x) * magic);
12 }
13
14 float get_random (vec2 x) {
15   return fract(sin(dot(x, vec2(12.9898, 4.1414))) * magic);
16 }
17
18 float gen_noise (vec2 x) {
19   vec2 d = vec2(0.0, 1.0);
20   vec2 f = floor(x);
21   vec2 c = smoothstep(vec2(0.0), vec2(1.0), fract(x));
22   return mix(
23     mix(get_random(f), get_random(f + d.yx), c.x),
24     mix(get_random(f + d.xy), get_random(f + d.yy), c.x),
25     c.y
26   );
27 }
28
29 vec4 get_frame (float offset, vec2 uv) {
30   float id = mod(offset + cameras_count, cameras_count);
31   vec2 uv_texture = vec2((id + uv.x) / cameras_count, uv.y);
32   return texture2D(u_texture, uv_texture);
33 }
34
35 vec2 fish_eye (vec2 uv, float power) {
36   vec2 center = vec2(0.5, 0.5);
37   vec2 uv_c = uv - center;
38   float d = length(uv_c);
39   float bind = power > 0.0 ? length(center) : center.x;
40
41   if (power > 0.0) {
42     // fisheye
43     return center + normalize(uv_c) * (
44       tan(power * d) * bind / tan(bind * power)
45     );
46   } else if (power < 0.0) {
47     // antifisheye
48     return center + normalize(uv_c) * (
49       atan(-power * d * 10.0) * bind / atan(-power * bind * 10.0)
50     );
51   }
52   return uv;
53 }
54
55 float gen_animated_noise (vec2 uv, float progress) {
56   return gen_noise(uv * 100. + fract(progress) * 1000.);
57 }
58
59 float gen_line_field (vec2 uv, float progress) {
60   float field = mod(uv.y + progress, 0.3);
61   return smoothstep(0.05, 0.1, field) - smoothstep(0.2, 0.25, field);
62 }
63
64 void main () {
65   float transition = fract(abs(u_time));
66   float offset = u_video_id + sign(u_time) * floor(abs(u_time));
67   float progress = sin(transition * pi);
68   vec2 uv_positive = fish_eye(uv, 1.5 * progress);
69   vec2 uv_negative = fish_eye(uv, -0.25 * progress);
70   vec4 color = mix(
71     get_frame(offset, uv_negative),
72     get_frame(offset + sign(u_time), uv_positive),
73     transition
74   );
75
76   vec3 noise = vec3(
77     gen_animated_noise(uv, transition * 0.25),
78     gen_animated_noise(uv, transition * 0.25 + 0.33),
79     gen_animated_noise(uv, transition * 0.25 + 0.66)
80   );
81   vec3 mask = vec3(
82     gen_line_field(uv, transition * 0.25 - 0.2),
83     gen_line_field(uv, transition * 0.25),
84     gen_line_field(uv, transition * 0.25 + 0.2)
85   );
86
87   vec4 noise_color = vec4(noise * mask * 0.5 * progress, 1.);
88   color = color + (1. - color) * noise_color;
89   gl_FragColor = color;
90 }
What's going on here? Above all, I compute in the variable offset what cameras take part in the transition. Pay attention to the function get_frame, which takes mentioned offset and uv-coordinates, and returns pixel of the corresponding video. That is to say, there is the only video, but in fact, three frames are joined in a line.
Then, for the frame of a previous camera, I use an effect fish_eye with the negative power, but for the next camera frame, with the positive one. The power is multiplied to progress, that is it reaches the maximum in the middle of the transition (because of transition is in the range of 0. to 1.). I'm not going to explain in detail how the function fish_eye works, but if you are really interested you can read this topic.
After the frames are mixed I generate the noise and the masks (one for each of red, green, and blue colors). And lastly, I apply the noise to the video using the corresponding mask.
PlayerApp
One day, still being a student, I had visited a shopping mall and saw there, on the floor, a projection of fishes, floating in the water. Under the normal conditions they swam slowly, but if someone cast the shadow, they went away from the appeared waves. I was very excited about realistic graphics and praised the work of programmers created it. 10 years later I remembered about fishes and wrote the delightful shader for the player.
The user can play or pause the video generating on every action a new wave (that is either transparent or blue). Before reading the code it's highly recommended to look carefully at the uniforms:
u_frame, obviously, is an image data of the video frame itself.u_resolution, obviously, the resolution of a video.u_pointsis an array of wave epicenters. Every epicenter has the following structure:[x, y, time, direction].u_last_directionis the direction of the last action (-1.for play,1.for pause). This information is excessive, it could be derived fromu_points, but given here to simplify the code of the shader.
 1 #define pi 3.1415
 2 #define pl 5
 3
 4 uniform sampler2D u_frame;
 5 uniform vec2 u_resolution;
 6 uniform vec4 u_points[pl];
 7 uniform float u_last_direction;
 8
 9 const vec2 center = vec2(0.5, 0.5);
10
11 vec2 center_point (vec2 point) {
12   return (point - center) * u_resolution.xy / u_resolution.x;
13 }
14
15 float gen_field (vec2 uv_c, vec4 point, float smoothness, float size) {
16   vec2 distortion = vec2(sin(uv_c.y * 32. + point.z * 32.) * 0.01, 0.);
17   return point.a * smoothstep(
18     point.z * size,
19     point.z * size - smoothness,
20     distance(uv_c + distortion, center_point(point.xy))
21   );
22 }
23
24 vec3 gen_wave (vec2 uv_c, vec4 point) {
25   float d = gen_field(uv_c, point, 0.3, 2.);
26   float front = min(1., 2. * sin(abs(d) * pi));
27   float amplitude = (1. - point.z) * front * sin(d * pi * 2.);
28   vec2 point_c = center_point(point.xy);
29   float angle = atan(uv_c.y - point_c.y, uv_c.x - point_c.x);
30   return vec3(
31     amplitude * cos(angle),
32     amplitude * sin(angle),
33     amplitude
34   );
35 }
36
37 void main (void) {
38   vec2 uv = gl_FragCoord.xy / u_resolution.xy;
39   vec2 uv_c = center_point(uv);
40
41   float field = step(0., u_last_direction);
42   vec3 wave = vec3(0.);
43   for (int p = 0; p < pl; p++) {
44     float d = gen_field(uv_c, u_points[p], 0.1, 1.75);
45     field = field + d;
46     wave += gen_wave(uv_c, u_points[p]);
47   }
48   field = clamp(field, 0., 1.);
49   wave = clamp(wave, -1., 1.);
50
51   vec3 source = vec3(texture2D(u_frame, uv + vec2(wave) * 0.05));
52   float s = (source.r + source.g + source.b) / 3.;
53   vec3 monochrome = vec3(0., 0.5 * s, s);
54
55   vec3 color = mix(source, monochrome, field);
56   float wave_mask = (0.25 + (1. - field) * 0.75);
57   color += source * wave_mask * (
58     wave.z < 0. ? wave.z * 0.2 : wave.z * 0.5
59   );
60   color += source * sin(field * pi);
61
62   gl_FragColor = vec4(color, 1.);
63 }
Firstly, I calculate the blue field, and the offset of frame coordinates adding the distortion (that is wave). Pay attention, that clamp is invoked after the loop because waves and fields of opposite signs should extinguish each other. Then I smoothly highlight the wave crest and the middle of the transition gradient between the transparent and blue colors.
ViewerApp
In the end, let's look at the shader of the gallery, where the user can zoom and drag an image.
 1 varying vec2 uv;
 2 uniform float u_progress;
 3 uniform vec2 u_resolution;
 4
 5 uniform vec2 u_size_from;
 6 uniform vec2 u_offset_from;
 7 uniform float u_zoom_from;
 8 uniform sampler2D u_image_from;
 9
10 uniform vec2 u_size_to;
11 uniform vec2 u_offset_to;
12 uniform float u_zoom_to;
13 uniform sampler2D u_image_to;
14
15 #define pi 3.1415
16 #define mask_breadth 0.02
17
18 vec4 draw (sampler2D image, vec2 uv_fit) {
19   return texture2D(image, uv_fit)
20     * step(0., uv_fit.x)
21     * step(0., uv_fit.y)
22     * step(0., 1. - uv_fit.x)
23     * step(0., 1. - uv_fit.y);
24 }
25
26 vec2 fit (vec2 size) {
27   return (gl_FragCoord.xy - u_resolution * 0.5 + size * 0.5) / size;
28 }
29
30 float calc_mask (float progress, vec2 uv) {
31   float wave1 = sin(progress * pi) * (
32     sin(uv.y * pi + progress) + sin(uv.y * 2. * pi + progress * 4.)
33   );
34   float wave2 = sin(progress * pi) * (
35     sin(uv.y * 16. * pi + progress * 16. + 1.)
36   );
37   float wave3 = sin(progress * pi) * (
38     abs(cos(uv.y)) * sin(uv.y * 32. * pi + progress * 16. - 1.)
39   );
40   float edge = progress
41     + 0.03 * wave1
42     + 0.005 * wave2
43     + 0.005 * wave3;
44   return smoothstep(edge + mask_breadth, edge - mask_breadth, uv.x);
45 }
46
47 void main () {
48   float progress = 0
49     - 2. * mask_breadth
50     + u_progress * (1. + 4. * mask_breadth);
51
52   float mask_from = 1. - calc_mask(
53     progress,
54     uv + vec2(mask_breadth, 0.)
55   );
56   vec2 size_from = u_size_from * u_zoom_from;
57   vec2 uv_fit_from = fit(size_from) + u_offset_from;
58   vec4 color_from = draw(u_image_from, uv_fit_from);
59
60   float mask_to = calc_mask(
61     progress,
62     uv + vec2(-mask_breadth, 0.)
63   );
64   vec2 size_to = u_size_to * u_zoom_to;
65   vec2 uv_fit_to = fit(size_to) + u_offset_to;
66   vec4 color_to = draw(u_image_to, uv_fit_to);
67
68   vec4 color = color_from * mask_from + color_to * mask_to;
69   vec4 fire = vec4(color.r * mask_from * mask_to, 0., 0., color.a);
70   gl_FragColor = color + fire;
71 }
The function calc_mask, suddenly, calculates the mask during the transition from the current image to the next one. To hide the mask both at the beginning and at the end of the transition, I map the value u_progress to progress.
The function fit returns the boundaries of the scaled image. Then, these boundaries shift depending on the user-defined offset. Pay special attention to step calls in the function draw: they are required to cut an image when the coordinates go beyond the boundaries.
Mobile Devices
I'd like to say a few words about mobile first approach. Forget it if you're going to make a website available on the stationary PC. Nobody writes the code on the cell phone, therefore by any stretch, the laptop version appears earlier, and then is adapted to mobile devices. Don't struggle with the natural order of the development, better spend more time on the adaptation process.
In order not to get confusing in dozens of the components used in various places, you need to form the list of breakpoints and use it everywhere in the @media rules, related to the window size. Also, I advise you to add media query @media (hover: hover) to most of pseudo-classes :hover, it will bring an interface closer to the native components on the mobile.
But that's just minor improvements. Back to the portfolio, nobody is going to move the "windows" on the smartphone, thus I turned them into the "applications". The virtual desktop switcher turned into the carousel button; now the user can flip through applications or close one of them by the swipe up gesture. As usual, touch events are handled by TouchArea, and besides I use an instance within an instance, each one is for its own gesture. All these things add even more complexity to the window system.
By the way, mentioned above carousel could be opened by a long tap but mobile Safari doesn't emit contextmenu, so I had to emulate such events manually.
Another sensitive topic is the virtual keyboard on mobiles, which resizes the window. Because of some bugs on Android, I had to detect whether it's opened to force the browser recalculating some styles, relying on vh units.
Finishing Touches
The project is done already, and it seems we have extra time to add some unnecessary features, for the sake of which the whole project was designed.
Console
Let's draw something in the console like international corporations do, trying to hire web developers. It could be ASCII graffiti or even an image with the link to my blog. Indeed, many webkit browsers allow us to output the graphics in the developer tools.
 1 console.clear();
 2 console.log('%cblog.zhevak.name', `
 3   font-size: 24px;
 4   font-weight: bold;
 5   font-family: monospace;
 6   color: white;
 7   line-height: 192px;
 8   text-shadow: 0 0 5px #ff5e00;
 9   background: url('https://zhevak.name/background.png') no-repeat;
10   background-size: contain;
11   -webkit-text-stroke: 1px black;
12 `);
Pay attention, that the path to an image should include the hostname.
DeveloperAlert
Let's show a message with the link to this article when the user opened the console. But how could we know that? Today, there is a "reliable" approach working at least on Chrome, Firefox, and Safari.
1 let key = -1;
2 const indicator = function () {};
3 const onOpen = () => alert('Console is opened!');
4 indicator.toString = () => {
5   ++key && onOpen();
6 };
7 console.log('%c', indicator);
How does it work? Every time the developer tools have been opened the browser tries to cast an indicator to a string to apply styles to the displayed message (that is an empty string). Then indicator.toString is invoked and does anything, but returning the styles.
Unfortunately, as I know, there is no way to detect the moment, when the console got closed, but it really doesn't matter for our case.
Workbox
One time, I wrote a Service Worker for the static website from scratch. Since that moment 3 years have passed but the resource is still available in my browser, even offline. Not bad, but I wish to get a bit more flexibility in updating the content. SW API was designed inconvenient, to put it mildly. This is why I decided to try Workbox by Google, and it paid off.
The documentation of the library leaves much to be desired. Anyway, it works out of the box, so if you value the time, I highly recommend you to take advantage of Workbox. So, I have such a case: I want to cache the content, then after 7 days I want to start attempts to update it from the server, and then after 30 days I want to clear cache completely only if no attempt was successful (let's give the user time to get to the Internet). What strategy should I use? NetworkFirst isn't suitable because I want to get fresh content just from the cache. StaleWhileRevalidate isn't suitable because I don't want to send requests to the server within the first 7 days. CacheFirst isn't suitable because I want to store outdated content until it's not updated. Nothing is suitable, and again I failed to avoid difficulties :-(
I was looking for articles about writing own strategy for Workbox but found source code at GitHub only. And that's not so bad: now we have examples (built-in strategies), and much more important, an object of service entities workbox.core._private. It's time to code.
 1 /* FreshOrCache */
 2
 3 var {cacheNames, cacheWrapper} = workbox.core._private;
 4
 5 class FreshOrCache extends workbox.strategies.StaleWhileRevalidate {
 6   constructor (options = {}) {
 7     if ((options.freshAgeSeconds > 0) === false) {
 8       throw 'Invalid freshAgeSeconds!';
 9     }
10     super(options);
11     this._freshCacheName = '__FreshCache__:' + this._cacheName;
12     this._freshPlugins = [
13       {
14         cacheWillUpdate: async ({response}) => {
15           if (response.status === 200 || response.status === 0) {
16             return response;
17           }
18           return null;
19         },
20       },
21       new workbox.expiration.Plugin({
22         maxAgeSeconds: options.freshAgeSeconds,
23         purgeOnQuotaError: true
24       })
25     ];
26   }
27
28   async handle ({event, request}) {
29     let response = await cacheWrapper.match({
30       cacheName: this._freshCacheName,
31       request,
32       event,
33       matchOptions: this._matchOptions,
34       plugins: this._freshPlugins
35     });
36
37     if (response) {
38       return response;
39     } else {
40       return super.handle({event, request});
41     }
42   }
43
44   async _getFromNetwork ({request, event}) {
45     const response = await super._getFromNetwork({request, event});
46
47     const freshCachePutPromise = cacheWrapper.put({
48       cacheName: this._freshCacheName,
49       request,
50       response: response.clone(),
51       event,
52       plugins: this._freshPlugins,
53     });
54
55     if (event) {
56       try {
57         event.waitUntil(freshCachePutPromise);
58       } catch (error) {
59
60       }
61     }
62
63     return response;
64   }
65 }
The new strategy behaves like CacheFirst within a period freshAgeSeconds, then it pretends to be StaleWhileRevalidate, from which all its methods inherit.
That's so cool to inherit a third-party library class, OOP is here as its best.
AutoResume
To always keep my resume up to date I wrote a script, which takes the data in JSON, list of languages, and list of renderers, and returns a bunch of files of different formats. In my case 2 languages are used: Russian and English, and 4 renderers: TxtRenderer, MdRenderer, PdfRenderer, and DocxRenderer. To make changes to 8 files I edit resume.json and type npm run autoresume.
If I modify my resume at least ten times, or like, the script will pay off the time spent on development.
Minification by svgo
Scripts are minified, styles are minified, what about images? We need to optimize them as well, and the best practice is to write a script running svgo automatically:
1 for f in $(ls files/works/*/logo.svg);
2   do svgo --config=svgo.config.json $f;
3 done
Containerization
Hooray, anything is done! Now it's time to deploy 23 projects that use incompatible versions of PHP, Python, Node.js and other dependencies. Thanks to the modern containerization technologies we can do that within a few hours days :-)
To deploy the portfolio and its satellite projects I wrote Bash script, which installs a required software on the host server, downloads all the repositories, builds images, and runs containers one by one using docker-compose up for each project.
Are there some troubles with a container collection? Well, at first, all the projects together consume about 4 GB of the memory and the hosting costs money. In the second place, if I need to update an already deployed project, I do it manually because CI hasn't been configured yet. As a temporary workaround for a couple of projects I wrote npm scripts, that upload new bundles to the server, and it's still enough for me.
Motivation
I said so much what I got done and what obstacles I overcame, but mentioned nothing about my motivation. Why did I want to contribute so much time and energy to the project? Of course, I'm going to use my portfolio searching for a new dream job, but most of my colleagues don't go beyond a matter-of-fact resume containing required buzzwords. As they do, I could find yet another company on the market and spend my time with "the benefit", earning thousands of dollars by creating similar redux forms... But wonder what made me tick, what forces shaped me, what may have molded me?
When I was three, my father assembled the first family computer. I still remember how I played the games of the 90s under MS-DOS with childlike wonder. When I was five, I heard accidentally how my parents describe to my elder brother the basics of programming, so they had to tell me about algorithms, flowcharts, and syntax of GW-BASIC too. At that date, I just learned how to use input, output and conditional operators, but it was enough to get me excited about computers for a long time.
One day, my parents decided I spend too much time on the computer and hid it from me. Fortunately, there was always some outdated hardware at our home. A few days later I made a new PC, but I still had no operating system. Luckily, one of my classmates learned Linux at that time and ordered by mail the free CD with Ubuntu distro, that he shared with me.
I explored the computer how it was possible: regularly I installed and removed various software, changed files, and settings, and looked, what it will lead to. Of course, with the advent of the Internet, anything was changed. Now I could search for information intentionally, and even discuss it with people from everywhere via IRC. Some of them helped me take the first steps in real programming when I mastered Visual Basic and wrote casual games.
I already knew you can not only create things but also break them. I played with cracks and exploits with no understanding of how they actually work, I tried to analyze the traffic and brute force the passwords. Surely, I hacked nothing but understood that informational technologies will completely change the world.
The more I learned, the stronger my curiosity got. My whole career is a quest for knowledge. As soon as my professional growth stopped, I left the company. Wow, you can give me 10% more to offset the impact of inflation for the last year... Thank you very much, but I'm not just here for the money. I'm much more interested in building scalable architecture and creating world-changing informational systems than increasing synthetic KPI. I still like anything related to computer science, I'm still hungry for the new technologies, but I hate when my skills are misused.
I've made this website to reveal how beautiful the code could be, and how this beauty is mapped to your browser. I am a hacker, and this is my manifesto. You may stop me, but you can't stop us all... After all, we're all alike ;-)